

The 1970s were all about a flashy, over-the-top Christmas dinner, where it wasn’t just about flavor but also flair. Home cooks rode the wave of the times’ affection for bold color and offbeat presentation, crafting dishes that were memorable. Let’s take another look at the classic ’70s holiday table, reimagined with a touch of humanity.
The ’70s Christmas was a feast of excess, with foods created to impress. Hosts transformed ordinary ingredients into works of art to eat, emphasizing display over restraint. Every plate was a paean to the decade’s playful, adventurous nature.
Kitchens hummed with imagination, as chefs experimented with gelatin, cheese, and canned food. These meals weren’t mere food these were meals designed to bring joy and conversation. The objective was to create the holiday magical and amplified.
This decade’s feasts were a mix of ambition and whimsy, frequently flirting with the ridiculous. But that’s what made them so great every dish reflected the ’70s “go big or go home” vibe. It was a time when Christmas dinner was anything but mundane.

1. Gelatin Christmas Trees
Gelatin Christmas Trees were the rickety stars of the ’70s Christmas table, serving as dessert and decoration. Those bright molds, usually in lime or cherry, were filled with fruits or marshmallows, formed into cheerful trees. They embodied the decade’s fascination with bright, flashy creations. Their shiny presence was holiday magic.
It took time to create these wobbly centerpieces, each bright layer carefully set. Families convened to be amazed at the spectacle before cutting into its shuddering layers. The unveiling was a celebratory ritual that made the meal extraordinary. It was a dish that shouted ’70s innovation.
These trees presented a light, fruit contrast to richer dishes, cleansing the palate. They carried through the era’s theme of playfulness and boldness, providing enjoyment in every wobble. The Gelatin Christmas Tree was a colorful, festive holiday touch.

Christmas Tree JIGGLERS
Equipment
- 2 Large Mixing Bowls For preparing the two distinct gelatin layers.
- 1 Measuring Cup For accurate liquid measurements.
- 1 Whisk To ensure complete dissolution of gelatin.
- 1 9×13 inch Baking Pan Or a similar shallow dish for setting the gelatin layers evenly.
- 1 Christmas Tree Cookie Cutters For festive shaping, ideally metal for clean cuts.
Ingredients
Main
- 2 cups boiling water divided
- 4 3 ounce packages JELL-O Lime Flavor Gelatin, divided
- 1 5 ounce can evaporated milk
- 1/4 cup multi-colored sprinkles
Instructions
- Lightly grease a 9×13 inch baking pan (or similar shallow dish) with cooking spray to prevent sticking.
- In a large heatproof bowl, combine 2 packages of JELL-O Lime Flavor Gelatin with 1 cup of boiling water; whisk thoroughly until the gelatin is completely dissolved.
- Carefully pour this first lime green gelatin mixture into the prepared pan and refrigerate for 30-45 minutes, or until partially set but still slightly sticky to the touch.
- In a second large heatproof bowl, combine the remaining 2 packages of JELL-O Lime Flavor Gelatin with the remaining 1 cup of boiling water; whisk until completely dissolved.
- Stir in the 5-ounce can of evaporated milk into the second gelatin mixture until the color is uniform and opaque.
- Once the first layer is partially set, carefully pour the milky green gelatin mixture over it, spreading evenly.
- Refrigerate the pan for at least 3-4 hours, or preferably overnight, to allow both layers to set firmly and completely.
- To release the gelatin, you may briefly dip the bottom of the pan in warm water, then run a thin knife around the edges of the pan.
- Using Christmas tree cookie cutters, press firmly through the gelatin layers to cut out desired shapes, wiping the cutter clean between each cut.
- Arrange the Christmas Tree JIGGLERS on a serving platter and decorate with multi-colored sprinkles just before serving.
Notes
- Vivid Colors: Colorful hues such as green and red yelled festive hooray.
- Playful Texture: The jig provided a playful, tactile touch.
- Creative Mix-Ins: Fruits or marshmallows created a different mold each time.
2. Holiday Tuna Tree
The Holiday Tuna Tree was a charming reminder of the ’70s ability to turn pantry staples into something unique. Imagine a firm tuna salad shaped into a conical tree and topped with olives or pimentos to resemble ornaments. It was a break from the norm of appetizers that didn’t take risks. This was a bold and memorable dish.
Hosts loved crafting this affordable dish into a holiday centerpiece. With crackers, it encouraged guests to scoop and share, making it a fun atmosphere. The Tuna Tree was about frugal creativity. It caused conversation at every occasion.
Though it may seem eyebrow-raising today, it was a daring expression of the age’s spirit of adventure. It showed that with enough imagination, even the humblest ingredients could be stars. This was a genuine ’70s talking point. Its eccentric appeal survives in memory.

3. Turkey In Aspic
Turkey In Aspic transformed the traditional holiday bird into a glistening wonder. Carved pieces of turkey were bathed in flavorful gelatin made from rich broth, making for a breathtaking centerpiece. It was the epitome of ’70s cooking spectacle. The presentation was a visual success.
Aspic took skill to produce its shiny, flawless appearance. It glimmered under Christmas lights, leaving visitors speechless at its beauty. It was an old tradition married to the decade’s passion for the dramatic presentation. This was ’70s elegance at its best.
While jellied turkey would be strange today, it was a sign of sophistication back then. Its lightness cut through rich tastes, standing out on the plate. Turkey In Aspic was a shocking, memorable holiday presence. It embraced the decade’s fearless attitude.

Turkey Aspic with Peas and Asparagus
Equipment
- 1 Saucepan For heating broth and dissolving gelatin
- 1 Measuring Cups and Spoons For accurate ingredient portions
- 1 Chef’s Knife and Cutting Board For preparing turkey and radish
- 4 Individual Aspic Molds or a Loaf Pan For shaping the aspic
- 2 Small bowls For soaking gelatin and blanching peas
Ingredients
Main
- 500 grams white pepper
- Salt and white pepper
- 200 grams shelled Peas or frozen
- 1 bunch Radish
- 200 grams Smoked turkey breast or cooked ham
- 6 sheets silver Gelatin
- 500 milliliters Vegetable broth
- 4 tablespoons Balsamic vinegar
- 3 teaspoons Sugar
- Salt
- freshly ground pepper
Instructions
- Soak the silver gelatin sheets in a bowl of cold water for 5-7 minutes until they are softened.
- Bring a small pot of lightly salted water to a boil, blanch the shelled peas for 2-3 minutes, then immediately plunge them into ice water to stop cooking and preserve their vibrant color. Drain well.
- Dice the smoked turkey breast into small, even pieces, and thinly slice the radishes for garnish.
- In a saucepan, heat the vegetable broth over medium heat. Add the balsamic vinegar, sugar, salt, and freshly ground pepper. Bring the mixture to a gentle simmer, then remove from heat.
- Squeeze any excess water from the softened gelatin sheets and stir them into the warm broth until they are completely dissolved. Ensure the mixture does not boil.
- Allow the gelatin mixture to cool slightly at room temperature, but make sure it doesn’t begin to set.
- Evenly distribute the diced turkey, blanched peas, and sliced radishes among your chosen individual aspic molds or a single loaf pan.
- Carefully pour the cooled gelatin mixture over the ingredients in the molds, ensuring all components are submerged.
- Refrigerate the molds for at least 3-4 hours, or preferably overnight, until the aspic is firmly set.
- To unmold, briefly dip the bottom of each mold in warm water, then invert onto serving plates. Serve chilled.
Notes
- Glossy Elegance: The shine of the aspic made it an eye-catching spectacle.
- Savory Depth: Broth and herbs imparted unexpected taste.
- Retro Flair: It captured the ’70s fascination with wobbly foods.

4. Brussels Sprouts Mould
The Brussels Sprouts Mould did the humble vegetable an at-home makeover with a festive sheen. The sprouts were arranged in a gelatin or creamy mold, making for a firm, attention-grabbing side dish. It was a testament to the fact that nothing was beyond the molding boom of the ’70s. This recipe was utter retro genius.
Hosts adored showcasing this long-neglected vegetable as something special and celebratory. The mold, when served with noodles, provided a playful architecture for the dish. It was an inventive move that got conversations started at the table. Its bold presentation was show-stopping.
The dish’s firm texture and earthy flavor made it a surprising hit. It brought a playful sophistication to the meal, blending the ordinary with the extraordinary. The Brussels Sprouts Mould was a ’70s classic. It was both unexpected and delightful.

5. Snowman Cake
The Snowman Cake was a whimsical dessert that added festivity to the ’70s Christmas spread. Frosted to look like a snowman, it had bright food coloring and sugary embellishments. It was a dramatic, playful dessert that maximized the era’s maximalist aesthetic. It was a fun holiday centerstage piece.
Bakers invested love in crafting these cakes, seeking charm and a dash of disorder. The end product could be both wonderful and a little scary, commanding center stage. It was a sweet ending that ignited laughter and smiles. Children and adults both loved its mischievous appearance.
This cake was not just a meal–it was a celebratory occasion, reflecting the decade’s embrace of fun. Its bright appearance was the ideal finish to a daring meal. The Snowman Cake was ’70s holiday enchantment. It made a lasting impression on all of the guests.
Snowman Cupcakes
Equipment
- 2 Mixing Bowls For crumbling cake and mixing fondant.
- 1 Spatula For mixing cake crumbles with frosting and frosting cupcakes.
- 1 Paring Knife For trimming cupcake tops and attaching small details.
- 1 Kitchen Scissors For cutting licorice laces.
Ingredients
Main
- 24 unfrosted vanilla cupcakes divided
- 1 16 ounce package vanilla frosting, divided
- 4 black licorice laces
- 6 red licorice laces
- 1 ounce ready-to-use white fondant
- 1 drop orange food coloring
- 48 candy-coated milk chocolate pieces such as M&M’s®
Instructions
- Trim the dry top off 12 of the cupcakes and crumble the soft cake interiors into a bowl. Add about 5 ounces of vanilla icing and mix well. Add more frosting if needed to bring the mixture together into a ball so that it can be easily shaped. Cover bowl and chill cake mixture in the fridge for 20 minutes.
- Frost remaining 12 cupcakes with a thin layer of white vanilla frosting.
- Remove cake mixture and roll with wet hands into 2 different sized balls for the snowmen’s torsos and heads, 12 bigger balls and 12 smaller balls. Stick a small ball on top of a big ball to make the snowman, using some frosting if the balls are not very sticky. Place snowmen onto frosted cupcakes.
- Cut black licorice laces into small squares for the eyes and mouth using scissors and attach them with the tip of a knife to the head.
- Mix white fondant with orange food coloring to turn it orange and make little carrot noses out of the orange fondant. Press into the snowman faces.
- Attach 2 dark colored candy-coated milk chocolate pieces into the torso and cupcake as buttons. Attach 2 candy-coated milk chocolate pieces on either side of the head and connect them with a piece of black licorice for the earmuffs.
- Cut red licorice laces into 2 1/2-inch long pieces and wrap around the snowman’s neck as a scarf.
Notes
- Bold Design: Bright colors and trim screamed festive flair.
- Family Joy: Its playful appearance thrilled children and adults alike.
- Showstopper: It was a dessert that commanded attention.

6. Blue Cheese Mousse
Blue Cheese Mousse added a splash of ’70s elegance to the holiday table. This rich, pungent appetizer was beat into a whipped, airy consistency, usually piped into glasses. It was a daring option for pioneering hosts. The mousse tasted luxurious but inviting.
Its dense, rich taste complemented crackers or vegetables, starting the meal in style. The mousse was a testament to the era’s penchant for decadent, creamy foods with a cosmopolitan flair. It was both comforting and thrillingly innovative. Guests couldn’t help but be drawn by its creamy charm.
This appetizer was a hit with the crowd, combining strong cheese with a silky texture. It contributed richness to the Christmas table, showing appetizers could get star treatment. The Blue Cheese Mousse was a classic from the ’70s. It was a savory beginning to the feast.
Blue Cheese Mousse
Equipment
- 1 Food Processor Essential for achieving a perfectly smooth blue cheese base.
- 1 Electric Mixer With a whisk attachment, or a stand mixer, for whipping cream efficiently.
- 2 Mixing Bowls One for the blue cheese mixture, one for whipping cream (preferably chilled).
- 1 Piping Bag with Round Tip For professional presentation and easy serving.
Ingredients
Main
- 6 ounces crumbled blue cheese
- 1 4 ounce package cream cheese
- kosher salt to taste
- freshly ground black pepper to taste
- ⅓ cup heavy whipping cream
Instructions
- Combine blue cheese and cream cheese in the bowl of a food processor; purée until completely smooth. Transfer to a bowl; season with salt and pepper.
- Beat cream in a chilled glass or metal bowl with an electric mixer until soft peaks form. Lift your beater (or whisk if beating by hand) straight up: the whipped cream will form soft mounds rather than a sharp peak. Fold whipped cream into blue cheese mixture, stirring until creamy with no lumps.
- Fit a piping bag with a coupler and round tip. Drop piping bag into a tall glass and fold edges down around the glass. Spoon blue cheese mixture into the bag. Gather edges and twist together to begin piping as desired.
Notes

7. Cheese Cones
Cheese Cones were the unheralded stars of the ’70s appetizer assortment. Bite-sized morsels, perhaps soft cheese piped into edible cones or baked in salty shapes, they were ideal for socializing. They were cheesy, easy, and unmistakably celebratory. Partygoers adored their whimsical nature.
Their adaptability rendered them a host’s fantasy, simple to prepare and infinitely flexible. Pitted with cheddar or pimento, they provided a flavor explosion in each mouthful. Cheese Cones were the pinnacle of ’70s party fare. They were the perfect fit within the holiday flurry.
These snacks complemented the time’s affinity for finger foods and innovative presentation. They facilitated conversation and snacking, contributing to the celebratory atmosphere. Cheese Cones were a tiny but potent holiday success. They maintained the celebration festive and enjoyable.
- Quick Prep: Perfect for time-pressed hosts during the holidays.
- Cheesy Goodness: A pleaser in each bite.
- Playful Shape: The cone shape provided festive fun.

8. Holiday Hostess Tree
The Holiday Hostess Tree was a gangly edible monstrosity of the ’70s. This flavorful centerpiece, probably a combination of cheeses, spreads, and vegetables shaped into a tree, was all about wow factor. It was a statement of holiday ingenuity. Guests couldn’t avoid it.
People congregated to snack its layers, ranging from rich dips to textural garnishes. The tree’s showy presentation made it the party centerpiece, creating wonder and conversation. It was a meal that was proclaiming party. It was encapsulating the ’70s flair for drama.
This invention reflected the decade’s enthusiasm for excess visuals. It wasn’t food it was a celebratory experience, with humor and hospitality mixed in. The Holiday Hostess Tree was an icon of the ’70s. It made every party memorable.

9. Sunday Supper Ring
The Sunday Supper Ring provided reassurance in the ’70s more chaotic dishes. This ring baked, hopefully filled with meat or vegetables, was a warm, comforting centerpiece. It added a note of tradition to the celebratory table. Its homestyle nature warmed each heart.
Its round shape encouraged sharing, ideal for family reunions and festive spirit. The dish paired rich tastes with a warm, comforting feel, earthed the meal. It reminded one of the hearts of the holidays. Everyone adored its homey charm.
This ring captured the ’70s affinity for family dining, putting everyone in the same room. Its plainness was its best feature, providing sheer comfort in each piece. The Sunday Supper Ring was a healthy classic. It grounded the celebratory feast wonderfully.
- Shared Joy: Its form promoted family bonding.
- Hearty Flavors: A warm counterpoint to full-bodied dishes.
- Retro Charm: It was nostalgic and celebratory.

10. Molded Cranberry Salad
The Molded Cranberry Salad was a shining star of the ’70s holiday table. This ruby-red gelatin, speckled with cranberries or pineapple, sparkled with festive spirit. It was a tart, crisp respite from richer fare. Its bright color illuminated the table.
It took a work of art to create this mold, with hosts striving for a flawless wobble. Its bright color and subtle jiggle thrilled guests, eliciting lively conversation. Salad was a reflection of the era’s craze for gelatin. It was a celebration staple.
It provided a sweet-tart harmony that paired well with rich roasts and casseroles. The dish tasted nostalgic yet fearless, capturing the ’70s holiday vibe. The Molded Cranberry Salad was a glimmering treat. It provided zing to each bite.
Cranberry Salad
Equipment
- 1 Food Processor For grinding cranberries and orange.
- 2 Mixing Bowls One large for the fruit mixture, one for dissolving gelatin.
- 1 Whisk Essential for thoroughly dissolving gelatin.
- 1 Serving Mold or Dish For chilling and presentation.
- 1 Measuring Cups For accurate ingredient measurement.
Ingredients
Main
- 2 cups cranberries
- 1 large orange cut into small pieces
- 1 cup white sugar
- 1 cup chopped celery
- 1 cup finely chopped walnuts
- 1 cup crushed pineapple drained
- 1 3 ounce package cranberry (or raspberry) flavored Jell-O mix
- 2 cups hot water
Instructions
- Gather all ingredients. Allrecipes/Julia Hartbeck
- Place cranberries, orange (including rind), and sugar in a food processor. Process together until the cranberries and orange are roughly ground and well combined with sugar. Allrecipes/Julia Hartbeck
- Transfer to a bowl. Stir in celery, walnuts, and pineapple until thoroughly mixed. Allrecipes/Julia Hartbeck
- Place gelatin in a bowl and pour hot water over top (don’t let stand). Whisk together to dissolve. Allrecipes/Julia Hartbeck
- Pour gelatin over the cranberry mixture. Stir to combine. Allrecipes/Julia Hartbeck
- Pour into the mold of your choice and chill until you are ready to serve. Allrecipes/Julia Hartbeck
- Enjoy! Allrecipes/Julia Hartbeck
Notes

11. Old-School Green Bean Casserole
The Old-School Green Bean Casserole was a holiday ’70s champion that never lost its luster. Its rich mushroom sauce, soft green beans, and crunchy onion topping were straight-up comfort food. It was a surefire crowd-pleaser. This dish warmed every table.
Its simplicity made it a staple of busy hosts, but it was rich and celebratory. The crispy onions added texture to the rich base, making every spoonful delightful. It was a comforting, welcoming centerpiece on the table. Nostalgia accompanied each bite.
This casserole brought together tradition and the ’70s penchant for convenience. It anchored the showy feast, providing comfort with each bite. The Green Bean Casserole is a timeless classic. It was holiday staple then and remains so now.
- Classic Comfort: Its rich texture was a crowd-pleaser.
- Crunchy Finish: Fried onions provided ideal texture.
- Simple Prep: Maximum flavor with minimal work.

12. Rum Balls
Rum Balls were the cheeky, drunken stars of the ’70s dessert world. These no-bake balls, coated in sugar or cocoa, contained a rum-infused punch that was the life of the party. They were the epitome of adult-friendly indulgence. Their naughty charm was irresistible.
Simple to prepare and consume, they were ideal for celebratory gatherings with great cheer. The chocolatey, liquor-kissed taste pleased partygoers, infusing the table with a fun, lighthearted atmosphere. Rum Balls were a saccharine tribute to the period’s rowdy fun. They ensured the party remained lively.
These snacks brought a dash of mischief, inducing giggles and lively chatter. They proved that Christmas could be festive and slightly naughty, finely striking the holiday balance. Rum Balls were a party staple of the ’70s. They added a buzzed spark to each bite.

13. Hot Cheesy Crab Dip
The Hot Cheesy Crab Dip was a warm, rich ’70s appetizer that took center stage. It was filled with crab and melted cheese and served warm with bread or crackers. The dip was unadulterated, palpable extravagance. It attracted guests to it like moths to a flame.
Its smooth texture and robust flavor made resisting impossible, inviting seconds. The dish combined luxury and comfort, befitting the age’s appreciation for strong starters. It was a hug in dip’s guise. Everyone dipped with gusto.
This dip united people in scooping and merrymaking conversation. It created a fun, communal atmosphere on the holiday table, making the party happen. The Hot Cheesy Crab Dip was not to be missed. It was ’70s excess at its finest.
Cheesy Hot Crab Dip
Equipment
- 1 Mixing Bowl
- 1 Rubber Spatula or Mixing Spoon
- 1 Oven-Safe Baking Dish Approx. 8×8 inch or similar
- 1 Oven With broiler function
- 1 Measuring Spoons For accurate seasoning
Ingredients
Main
- 1 8 ounce package cream cheese, softened
- ½ cup shredded Parmesan cheese
- 2 teaspoons hot sauce
- 1 teaspoon seafood seasoning such as Old Bay®
- 1 teaspoon garlic powder
- 1 pinch ground black pepper
- 1 16 ounce can crabmeat
- 1 medium green bell pepper diced
- 1 medium red bell pepper diced
- ½ cup diced sweet onion
- 2 tablespoons shredded Parmesan cheese or to taste
Instructions
- Preheat the oven to 325 degrees F (165 degrees C).
- Combine cream cheese, 1/2 cup Parmesan cheese, hot sauce, seafood seasoning, garlic powder, and black pepper in a bowl; stir to combine.
- Drain crab; pick out and discard any shells. Add crab to cream cheese mixture, along with bell peppers and onion; mix thoroughly. Transfer into a baking dish and sprinkle with remaining Parmesan.
- Bake in the preheated oven until bubbly, about 20 minutes. Turn on the broiler and broil until the top is a nice golden brown color, about 5 minutes.
Notes
- Crowd-Pleaser: Its heat and taste were irresistible.
- Rich Luxury: Crab and cheese seemed special and celebratory.
- Social Vibe: Ideal for holiday socializing and passing around.
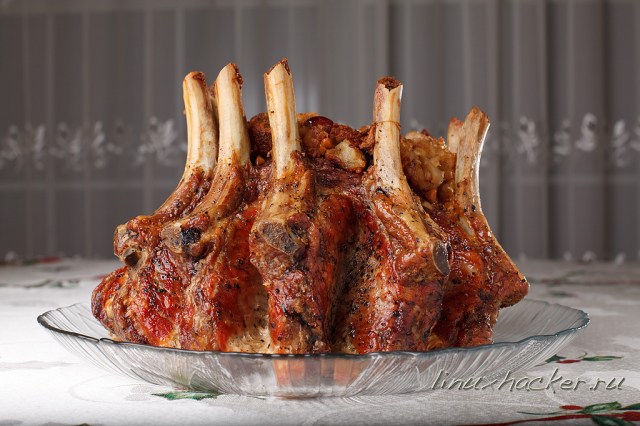
14. Pork Crown Roast
The Pork Crown Roast was the pièce de résistance of the ’70s Christmas table, a genuine showstopper. Its rounded shape, topped with frilly bone covers, was both refined and theatrical, drawing the eye. The roast was holiday magic in every sense. It lit up the table with majesty.
Roasted to tender heaven, it presented hearty, meaty flavors that guests adored. The presentation, bones reaching for the sky, was a reminder of the theatricality of the era. It made Christmas just special enough. Each bite a celebration.
The crown roast was not just food it was a declaration of holiday aspiration. It added unparalleled majesty to the plate, grounding the bold meal perfectly. This dish was the quintessential ’70s symbol. It made an indelible mark on everyone.
Stuffed Crown Roast of Pork
Equipment
- 1 Roasting Pan with Rack Essential for even roasting and catching drippings.
- 1 Large Skillet For sautéing aromatics for the stuffing.
- 1 Large Mixing Bowl For combining stuffing ingredients thoroughly.
- 1 Instant-Read Meat Thermometer Crucial for accurately checking internal temperature for food safety and optimal doneness.
- 1 Aluminum Foil For covering stuffing and protecting chop bones from charring.
Ingredients
Main
- 3 tablespoons butter
- ¾ cup chopped onion
- ½ cup peeled cored and chopped tart apple
- ¼ cup chopped celery
- 1 pound ground pork
- ½ pound ground seasoned pork sausage
- ½ cup fresh bread crumbs
- ½ cup chopped parsley
- 1 ½ teaspoons salt
- 1 ½ teaspoons ground black pepper
- ½ teaspoon dried sage
- 9 pounds crown pork roast
Instructions
- Preheat the oven to 350 degrees F (175 degrees C). Place a rack in a shallow roasting pan.
- Melt butter in a large skillet over medium heat until foam subsides. Sauté onion in hot butter for about 5 minutes. Stir in apple and celery; sauté without browning, about 5 minutes more. Transfer onion mixture to a large mixing bowl.
- Add ground pork, sausage meat, bread crumbs, parsley, salt, pepper, and sage to onion mixture in the bowl; mix gently but thoroughly. (To taste for seasoning, fry a small ball of stuffing in the skillet until pork is cooked through.)
- Fill the center of the crown with stuffing, mounding it slightly. Cover stuffing with a round of aluminum foil; wrap the ends of the chop bones in strips of foil to prevent them from charring and snapping off. Place the crown on the rack in the prepared pan.
- Roast pork in the center of the preheated oven for about 3 hours, removing foil from stuffing about 30 minutes before pork is done to allow the top to brown. An instant-read thermometer inserted into the center of meat near the bone should read at least 145 degrees F (63 degrees C).
- Carefully transfer pork to a large, heated, circular platter. Remove foil from the ends of the chops and replace with paper frills. Let pork rest for about 10 minutes before carving and serving.
Notes
A Legacy of Festive Flair
The ’70s Christmas dinner was a colorful, bold affair of taste and imagination. From wobbly molds to robust roasts, these dishes characterize a decade that reveled in being different. They remind us that holidays are for joy, connection, and making bold decisions.
So this Christmas, indulge that ’70s vibe with open hearts and adventurous taste buds. Whip together a wiggly salad or cheesy dip, and the holiday hijinks will be underway. Your table will be as memorable as the decade.

 12 Frozen Chicken Pot Pies")
