

Crescent rolls are the hostess’s best friend, converting simple ingredients into appetizers that are far more elegant in appearance and taste than their simple preparation would suggest. Their flaky, buttery texture provides the ideal foundation for a diverse array of fillings, ranging from meat to fruit, and so they are suitable for any type of event. No matter if you’re having a relaxed game night or a celebratory holiday bash, these rolls provide pleasingly delicious results with little to no work. Their flexibility enables you to make bites that taste both homey and sophisticated, leaving guests impressed when they leave.
What makes crescent rolls special is their ability to be transformed to fit any flavor profile but still be easy to deal with. One can of dough will form pinwheels, wreaths, or braids, all turning the ordinary ingredients into something special. They bake to a golden, crunchy finish that gives the spread an extra touch of elegance. After a matter of minutes of preparation, you can create appetizers that inspire conversation and tame cravings, all without you lingering in the kitchen.
This article takes a dive into 14 crescent roll appetizer recipes, one for convenience and maximum taste. Ranging from cheesy, flaky rings to subtly sweet braids, they suit various tastes and gatherings. Combined with useful tips for retaining crispness and make-ahead convenience, these recipes will make you the host with confidence and flair and provide for memorable gatherings.

1. BBQ Chicken Pizza Rolls
These rolls bring the smoky, tangy flavor of BBQ chicken pizza into a convenient, handheld package. Shredded chicken, BBQ sauce, and cheese are rolled in crescent dough, providing a lighter, fresher substitute for store-bought pizza rolls. Prepared in approximately 45 minutes, these rolls provide eight large servings, ideal for casual entertaining or family supper. Their comforting flavors and golden flaky crust make them a crowd-pleaser for all ages, so be sure to grab one before they’re gone.
- Use pre-cooked chicken to cut prep time.
- Brush with olive oil to bake for a crunchy crust.
- Serve with additional BBQ sauce for dipping.
The pairing of tangy sauce, gooey cheese, and buttery dough produces a comforting, indulgent texture. These rolls are perfect for game day or low-key nights, with homemade taste without the fuss. They’re a pleaser that tastes decadent but guilt-free.
BBQ Chicken Calzones
Equipment
- 1 Large Skillet For cooking bacon, chicken, and onion
- 1 Baking Sheet For rolling dough and baking calzones
- 1 Chef’s knife For chopping onion and cutting calzones
- 1 Cutting Board For preparing ingredients
- 1 Fork For sealing calzone edges
Ingredients
Main
- 4 slices bacon
- 3 cups shredded cooked chicken breast meat
- ½ small onion chopped
- ⅔ cup barbeque sauce
- 1 10 ounce can refrigerated pizza crust dough
- 1 cup shredded mozzarella cheese
- 2 tablespoons chopped fresh cilantro
Instructions
- Preheat the oven to 400 degrees F (200 degrees C).
- Place bacon in a large skillet and cook over medium-high heat, turning occasionally, until evenly browned, about 10 minutes. Drain bacon slices on paper towels; crumble.
- Add shredded chicken and onion to hot bacon grease in the pan. Cook and stir over medium heat until onion is tender. Stir in 1/3 cup barbeque sauce; remove from heat. Mix in crumbled bacon.
- Roll pizza crust dough onto a greased cookie sheet. Press out to an even thickness, then cut in half. Divide chicken mixture between dough pieces, spreading over 1/2 of each dough piece to within 1/2 inch of the edge.
- Drizzle remaining barbeque sauce over the filling. Sprinkle with cheese and cilantro. Fold uncovered portion of dough over the filling. Press the edges together with a fork to seal.
- Bake in the preheated oven until browned, about 25 minutes. Cool for a few minutes, then cut each calzone in half for 4 servings. Serve with additional barbeque sauce if desired.
Notes

2. Spinach Dip Crescent Wreath
This wreath is a beautiful centerpiece, combining creamy spinach dip with crescent dough in a sun-shape formation. Its simple design appears complicated but is really easy to prepare, making it great for holiday entertaining or festive celebrations. The warm, flaky crust pairs beautifully with the rich, herbaceous filling, drawing guests in with both flavor and presentation. It’s a showstopper that takes any appetizer platter to the next level.
- Pre-cook spinach to drain excess moisture.
- Use a small bowl to act as a guide for dough placement.
- Bake on parchment paper for no sticking.
The wreath’s bright green filling and golden dough make it a showstopper. It’s simple to prepare but resembles a culinary work of art, allowing you to impress without the stress. Serve warm to emphasize the soothing flavors and watch it disappear in no time.

3. Ham and Cheese Pinwheels
Ham and cheese pinwheels stack flavorful ham, gooey cheese, and a spicy kick of horseradish in flaky crescent dough. These easy-to-assemble bite-sized curls require few ingredients but are always popular for their timeless, comforting taste. Ideal for low-key gatherings or lunchboxes, they provide a sophisticated spin on a common pair. Their ease makes them a favorite of busy hosts looking for tried-and-true crowd-pleasers.
- Spread a thin coating of mustard or horseradish for flavor.
- Chill rolled dough before slicing for clean cuts.
- Serve warm for maximum gooeyness.
The spiral shape of pinwheels and strong flavors take a classic combination to a new level. They’re perfect for parties, providing a combination of creamy, savory, and spicy flavors. With minimal effort, they have big impact.
Ham and Cheese Pinwheels
Equipment
- 1 Baking Sheet
- 1 Parchment Paper
- 1 Rolling Pin
- 1 Sharp Knife Preferably non-serrated for clean cuts
- 1 Cutting Board For slicing the roll
Ingredients
Main
- ½ 17.5 ounce package frozen puff pastry, thawed
- 1 tablespoon Dijon mustard or more to taste (Optional)
- 7 slices deli ham
- 7 slices mild Cheddar cheese or as needed
Instructions
- Preheat oven to 375 degrees F (190 degrees C). Line a baking sheet with parchment paper.
- Dust a flat work surface lightly with flour. Unroll puff pastry and roll out to a rectangle. Spread with mustard and cover with Cheddar cheese slices, leaving a 1-inch border. Add a layer of ham slices on top. Roll puff pastry up tightly like a jelly roll.
- Slice puff pastry roll in 1/4-inch-thick slices and lay on the prepared baking sheet.
- Bake in the preheated oven on the center rack until lightly browned and puffed up, 15 to 20 minutes.
Notes

4. Cheesy Garlic Chive Cruffins
These flavorful cruffins combine strong garlic, gooey cheese, and fresh chives in crescent dough for a classic muffin’s addictive spin. Their bright yellow crust and soft, herby interior make them a hit as a snack or side dish. A garlic butter brush after baking gives them a glossy sheen and additional savory richness. They’re easy to prepare, great for hosts who want to bring sophistication without complication.
- Use a muffin tin for even shaping.
- Don’t cut back on cheese for a gooey center.
- Store leftovers in a sealed container.
The cruffins’ scented filling and light, airy texture make them great for any meal. They complement soups or salads nicely but are substantial enough to stand alone. Under 30 minutes, they’re a busy evening’s quick solution.

5. Pigs in a Blanket
Whole hot dogs wrapped in crescent dough with a cheesy spin turn this retro favorite into a satisfying appetizer. Easy to make and enjoyable by anyone, they’re perfect for game day, family night, or impromptu parties. The buttery crunch of the dough surrounds the flavorful filling, making every bite warm and comforting. They’re an old-fashioned crowd-pleaser that never disappoints.
- Use quality hot dogs for more flavor.
- Add sesame seeds for extra texture.
- Bake until golden for a crisp exterior.
The cheesy, gooey interior contrasts perfectly with the flaky dough and savory hot dog. They’re simple to assemble yet deliver big on flavor, making them a go-to for any occasion. Serve with mustard for a fun, familiar touch.

Ricotta-Stuffed Bacon-Wrapped Dates
Equipment
- 1 Baking Sheet
- 1 Parchment Paper
- 1 Toothpicks approx. 25 needed
- 1 Bamboo Skewer for pitting dates
- 1 Kitchen Shears/Scissors for bacon and plastic bag
Ingredients
Main
- 1 pound about 12 to 13 slices bacon, preferably thick-cut
- 25 Medjool dates about 3/4 pound
- 1/3 cup ricotta cheese
- Special Equipment: toothpicks a bamboo skewer for removing pits
Instructions
- Preheat oven to 450 degrees F.
- Cut the bacon in half lengthwise to make twice as many slices. Set aside. To remove the pits from the dates, cut the tips off each end of the dates and insert the flat end of the skewer until it pushes the pit out of the date. Repeat with remaining dates.
- Place the ricotta in the bottom corner of a strong plastic bag and seal tightly. Use scissors to cut a small hole in the tip of 1 of the corners. Now use the bag like a piping bag to fill the dates with the cheese.
- Wrap the ricotta stuffed dates with a slice of bacon and secure with a toothpick through the belly of the date. Arrange all the prepared dates on a parchment-lined baking sheet, allowing at least a little space between each one for good browning. Roast for 15 to 20 minutes or until bacon is browned and crispy. Remove from the baking sheet and gently remove toothpicks. Serve immediately.
Notes

6. Spinach Artichoke Pinwheels
These pinwheels fill the creamy, herby flavors of spinach artichoke dip into flaky crescent dough, making for a rich but accessible appetizer. Their strong flavor and fast preparation make them a party or game day must-have. With every bite comes a sumptuous combination of cheese, spinach, and artichoke, encased in buttery pastry. They’ll be a crowd-pleaser.
- Double the recipe for bigger groups.
- Use fresh herbs to provide a bright flavor.
- Carefully slice to keep spirals intact.
The pinwheels’ dense filling and airy dough provide a great contrast. They’re easy to put together, ideal for spontaneous parties, and best served hot to showcase their creamy texture. Prepare for them to vanish quickly.

Spinach Artichoke Dip Pinwheels
Equipment
- 1 Large Mixing Bowl
- 1 Cutting Board
- 1 Chef’s knife
- 1 Rolling Pin
- 1 Baking Sheet
Ingredients
Main
- * 1 refrigerated pizza dough
- * 1 15 oz can artichoke heart
- * 10 oz frozen spinach
- * 1 1/2 cup shredded mozzarella cheese
- * 1/2 cup mayonnaise
- * 8 oz cream cheese softened
- * 1 tablespoon minced garlic
- * 1/2 tsp dried basil
- * 1/4 tsp garlic salt
Instructions
- Preheat your oven to 375°F (190°C). Line a baking sheet with parchment paper.
- Thaw the frozen spinach completely, then squeeze out as much excess water as possible using a clean kitchen towel.
- Drain and finely chop the canned artichoke hearts.
- In a large mixing bowl, combine the softened cream cheese, mayonnaise, minced garlic, dried basil, and garlic salt until smooth.
- Add the drained spinach, chopped artichoke hearts, and shredded mozzarella cheese to the cream cheese mixture. Mix until well combined.
- Unroll the refrigerated pizza dough on a lightly floured surface or parchment paper. Spread the spinach artichoke dip evenly over the entire surface of the dough, leaving a small border.
- Starting from one long side, tightly roll up the dough into a log.
- Carefully transfer the log to the prepared baking sheet. For cleaner slices, you may chill the log in the refrigerator for 15-20 minutes.
- Slice the log into 1/2-inch thick pinwheels and arrange them flat on the prepared baking sheet.
- Bake for 15-20 minutes, or until the pinwheels are golden brown and the cheese is bubbly. Serve warm.
Notes

7. Bacon Cream Cheese Crescent Rolls
These decadent morsels unite crispy bacon and smooth cheese in a bite-sized crescent roll form, and serve up a smoky, savory kick. Ready in fewer than 20 minutes, they’re ideal for speedy snacking or party food. Their deep flavor ensures they’re an unforgettable experience, and are suitable for any occasion. With only three principal ingredients, they’re a host’s best friend.
- Pre-cook bacon for crispiness.
- Experiment with a garlic butter dip for added pizzazz.
- Prepare ahead and chill until baking.
Each bite explodes with savory flavor, making them a rich and easy choice. They’re small but full of taste, great for guests to indulge in with no muss. Serve plain or with a dip for extra decadence.
Bacon Appetizer Crescents
Equipment
- 1 Mixing Bowl For combining the filling ingredients
- 1 Spatula or Mixing Spoon For blending and spreading the cream cheese mixture
- 1 Baking Sheet Lined with parchment paper for non-stick baking
- 1 Sharp Knife For precisely halving the crescent dough triangles
- 1 Measuring Spoons For accurate ingredient measurement
Ingredients
Main
- 1 8 ounce package PHILADELPHIA Cream Cheese, softened
- 8 slices OSCAR MAYER Bacon cooked, crumbled
- ⅓ cup KRAFT Grated Parmesan Cheese
- ¼ cup finely chopped onions
- 2 tablespoons chopped fresh parsley
- 1 tablespoon milk
- 2 8 ounce packages refrigerated crescent dinner rolls
Instructions
- Preheat the oven to 375 degrees F (190 degrees C).
- Mix cream cheese, bacon, Parmesan cheese, onion, parsley, and milk together in a bowl.
- Separate each can of dough into 8 triangles; cut each triangle lengthwise in half. Spread each dough triangle with 1 generous teaspoon cream cheese mixture; roll up, starting at short side of triangle. Place, point-side down, on baking sheet.
- Bake in the preheated oven for 12 to 15 minutes or until golden brown. Serve warm.
Notes

8. Garlic Cheese Crescent Rolls
These rolls combine warm, cheesy goodness with the subtle kick of garlic, making for a cozy side or snack on its own. With only seven ingredients and 20 minutes, they’re a fast fix for injecting flavor into any meal. Their gooey, melty texture and golden glaze make them irresistible. They’re great for frazzled hosts who want gourmet results with little effort.
- Use freshly minced garlic for depth.
- Brush with butter after baking for shine.
- Warm for optimum texture.
The rolls’ scented filling and flaky crust complement parties or dinners. They’re simple to prepare, even on busy nights, and provide a rich texture. Their ease promises substantial flavor without the fuss.
Spinach and Artichoke Dip-Stuffed Crescent Rolls
Equipment
- 1 Large Mixing Bowl For combining the dip ingredients.
- 1 Baking Sheet Standard half-sheet size is ideal.
- 1 Parchment Paper or Silicone Baking Mat Essential for non-stick baking and easy cleanup.
- 1 Spatula or Spoon For mixing ingredients and scooping the filling.
- 1 Measuring Spoons For accurate seasoning.
Ingredients
Main
- 3 cups chopped fresh spinach leaves
- 1 14 ounce can artichoke hearts, drained and chopped
- 1 8 ounce container whipped cream cheese, softened
- ¼ cup mayonnaise
- ¼ cup crumbled feta cheese
- 2 tablespoons grated Parmesan cheese
- 2 cloves garlic minced
- kosher salt and freshly ground pepper to taste
- 3 8 ounce tubes refrigerated butter-flavored crescent rolls
- ½ cup fine Italian bread crumbs
Instructions
- Preheat the oven to 375 degrees F (190 degrees C). Line a baking sheet with parchment paper or a silicone baking mat.
- Mix spinach, artichoke hearts, cream cheese, mayonnaise, feta cheese, Parmesan cheese, and garlic together in a large bowl; season with salt and pepper.
- Remove rolls from each can and separate into 8 triangles for a total of 24. Place a heaping tablespoon spinach-cream cheese mixture on the wide end of each triangle. Roll up each triangle, starting at the wide end; fold the ends underneath and dredge in bread crumbs to coat. Place seam-side down on the prepared baking sheet.
- Bake in the preheated oven until golden brown, 10 to 12 minutes. Serve hot.
Notes

9. Jalapeno Popper Crescent Rolls
These rolls encase the hot, rich flavors of jalapeno poppers in crescent dough, tempering heat with flaky comfort. Their spicy kick is a party favorite at any gathering, appealing to spice enthusiasts and conservative eaters alike. The crunch of the dough pairs well with the bright filling, making for a great bite. They’re easy to make and universally adored.
- Seed jalapenos for milder flavor.
- Add extra cheese for a gooey center.
- Bake on a rack to prevent sogginess.
A combination of creamy cheese, spicy jalapeno, and buttery dough is provided by each bite. They’re great for parties or game days, served alongside a chilling dip such as ranch. Their strong flavor makes them a crowd-pleaser.
Baked Mummy Jalapeno Poppers
Equipment
- 1 Baking Sheet
- 1 Parchment Paper
- 2 Mixing Bowls For cheese filling, and egg/flour dredge
- 1 Pizza Cutter or Small Knife For cutting crescent dough strips
- 1 Spoon For filling jalapenos and mixing
Ingredients
Main
- 5 ounces cream cheese softened
- 3 ounces shredded Cheddar cheese
- salt and freshly ground black pepper to taste
- 6 large fresh jalapeno peppers halved lengthwise and seeded
- 1 10 ounce can refrigerated crescent rolls
- 1 egg beaten
- 1 tablespoon milk or as needed
- ¼ cup all-purpose flour
- 24 candy eyeballs
Instructions
- Gather all ingredients. Preheat oven to 350 degrees F (175 degrees C). Line a baking sheet with parchment paper. Allrecipes/Qi Ai
- Combine cream cheese and Cheddar cheese in a bowl and season filling with salt and pepper. Spoon filling into jalapeno halves. Allrecipes/Qi Ai
- Roll out crescent dough on a lightly floured surface and cut into thin strips using a pizza cutter or a small knife. Wrap stuffed jalapenos with dough strips, leaving a small space unwrapped where the eyes will go. Allrecipes/Qi Ai
- Combine egg and milk in a bowl. Add flour to another bowl and season with salt and pepper. Dip stuffed jalapenos first in the egg mixture, then roll in the flour. Place on the prepared baking sheet. Allrecipes/Qi Ai
- Bake in the preheated oven until dough is lightly browned, 15 to 20 minutes. Allrecipes/Qi Ai
- Remove from baking sheet and stick candy eyeballs in melted cheese. Allrecipes/Qi Ai
Notes

10. Sausage and Cheese Crescent Ring
This beautiful ring pairs delicious sausage and gooey cheese in a visually appealing configuration, ideal as a party appetizer centerpiece. The golden, flaky crust appears high-end but is easy to make, a perfect choice for parties. A glaze made from an egg wash provides a shiny, pro-looking finish. It’s a filling, flavorful choice that wows with minimal work.
- Crumble sausage well for even distribution.
- Use parchment paper for easy transfer.
- Serve with mustard or marinara for dipping.
The rich filling and beautiful presentation of the ring make it a party showstopper. It’s heavy enough to serve but still easy to slice, with a warm, gooey mouthful. Serve hot to enjoy its comforting flavors.
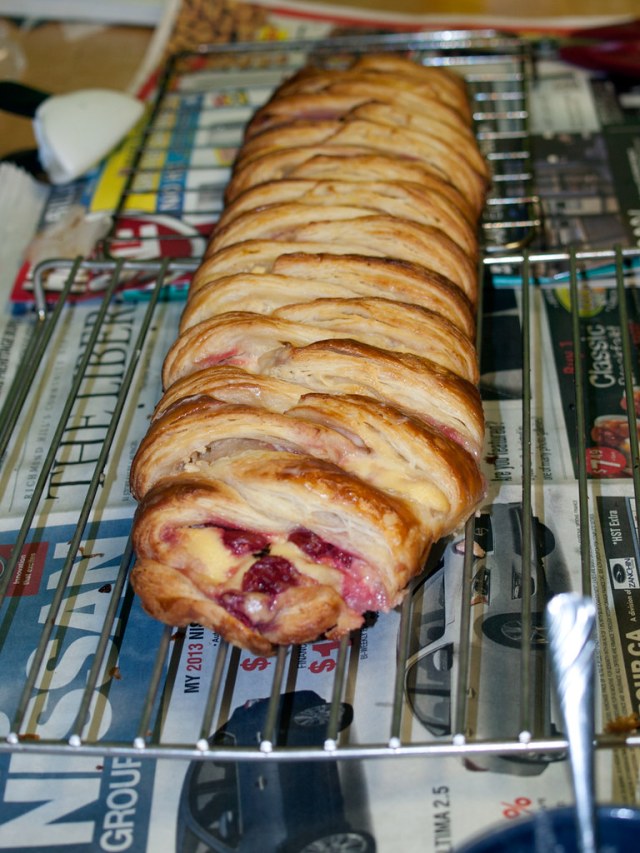
11. Cranberry Brie Crescent Braid
This braid combines creamy brie, tart cranberry, and herbaceous rosemary in a golden crescent shell, bringing together sweet and savory. The topping of almonds and sugar provides crunch and sweetness and serves as a good appetizer or dessert. Its bold flavors and beautiful presentation make it perfect for holidays and special events. It’s a showstopper and simple to make.
- Chill brie before slicing for clean cuts.
- Seal dough edges to avoid leaks.
- Serve at room temperature for convenient slicing.
The braid’s light, airy dough and decadent filling make for a rich texture. It’s ideal for hosts who want glamour without fuss, providing an upscale flavor experience. Its versatility makes it a party favorite.

Sausage and Cheese Crescent Squares from Pillsbury
Equipment
- 1 Large Skillet
- 1 Mixing Bowl Medium-sized
- 1 Baking Sheet 13×9-inch or similar
- 1 Spatula or wooden spoon For browning and mixing
- 1 Sharp Knife or Pizza Cutter For portioning after baking
Ingredients
Main
- 2 8 ounce cans Pillsbury® refrigerated crescent dinner rolls or Pillsbury® Crescent Recipe Creations® refrigerated seamless dough sheet
- 1 pound spicy or mild bulk pork sausage
- 1 8 ounce package cream cheese
- 2 cups shredded sharp Cheddar cheese
Instructions
- Preheat your oven to 375°F (190°C).
- In a large skillet, brown the bulk pork sausage over medium heat, breaking it apart with a spatula until no pink remains. Drain off any excess fat thoroughly.
- Transfer the browned sausage to a medium mixing bowl. Add the softened cream cheese and 1.5 cups of the shredded sharp Cheddar cheese. Mix until well combined and smooth.
- Unroll one can of crescent dinner rolls (or one seamless dough sheet) onto an ungreased 13×9-inch baking sheet. Press the seams together firmly to form a solid rectangular base.
- Evenly spread the prepared sausage and cheese mixture over the crescent dough, leaving a small border around the edges.
- Unroll the second can of crescent rolls and carefully place it over the sausage mixture. Gently press the seams together, then firmly crimp the edges of both dough layers together to seal the filling inside.
- Sprinkle the remaining 0.5 cup of shredded sharp Cheddar cheese evenly over the top layer of crescent dough.
- Bake for 20-25 minutes, or until the crescent dough is golden brown and the cheese is melted and bubbly.
- Remove from the oven and let cool on the baking sheet for 5-10 minutes to allow the filling to set.
- Using a sharp knife or pizza cutter, cut the baked square into approximately 32 individual squares and serve warm.
Notes

12. Cranberry Brie Bites
These bite-sized treats condense the braid’s sophisticated flavors into muffin-tin servings, perfect for convenient hosting. Prepared in less than 30 minutes, they pair creamy brie, piquant cranberry, and flaky dough for refined bite. Their diminutive size and bright flavor make them great for holidays or brunches. They’re a tribute to simplicity shining through.
- Use a mini muffin tin for evenly sized bites.
- Garnish with fresh rosemary on top.
- Prepare in advance and bake fresh.
The bites’ sweet-savory flavor and flaky texture are impossible to resist. They’re simple to serve and impress company with minimal fuss. Ideal for any occasion, they’re bound to be a crowd-pleaser.

Cranberry-Brie Bites
Equipment
- 1 Mini Muffin Tin
- 1 Sharp Knife
- 1 Cutting Board
- 1 Small spoon For portioning cranberry sauce
Ingredients
Main
- 1 1/2 cups cranberry sauce use homemade or store-bought cranberry sauce
- 1 puff pastry sheet
- 1 brie triangle chilled
Instructions
- Preheat oven to 375 degrees F.
- Thaw puffy pastry sheet flat. Cut puff pastry sheet into approximately 3-inch squares and place them into mini muffin tins, pressing them into the shape of the muffin hole. Place a 1-inch slice of brie in the center of each puff pastry and then top it with approximately 1 tablespoon of cranberry sauce.
- Bake 10 minutes or until puff pastry corners are toasted light brown. Let cool 5 minutes before serving.
Notes

13. Spinach Artichoke Dip Cups
These cups capture the rich, herbal flavors of spinach artichoke dip in bite-sized, sanitary form. The crescent dough provides a wonderful crunch, and they’re an intelligent variation on a party favorite. Fast to prepare, they’re ideal for gatherings or parties. With their strong flavor, they’re sure to be a hit with your guests.
- Drain the artichokes to keep them from being too moist.
- Use a muffin tin to make shaping easy.
- Serve hot for best flavor.
The individual portions of the cups minimize double-dipping issues, making the party that much more enjoyable. Their crispy exterior and luscious filling provide a lovely contrast. They will be a favorite go-to appetizer.
Spinach and Artichoke Dip
Equipment
- 1 1-Quart Baking Dish
- 1 Large Mixing Bowl
- 1 Spatula or Mixing Spoon
- 1 Measuring Cups For accurate ingredient portions
Ingredients
Main
- 1 14 ounce can artichoke hearts, drained and chopped
- 1 10 ounce package frozen chopped spinach, thawed and drained
- 1 cup mayonnaise
- 2 ½ cups shredded Monterey Jack cheese
- 1 cup grated Parmesan cheese
Instructions
- Preheat the oven to 350 degrees F (175 degrees C). Lightly grease a 1-quart baking dish.
- Combine artichoke hearts, spinach, and mayonnaise in a bowl; mix in 2 cups Monterey Jack, then mix in Parmesan. Transfer to the prepared baking dish and sprinkle with remaining 1/2 cup Monterey Jack.
- Bake in the preheated oven until cheese is melted, about 15 minutes.
Notes
14. Crab Rangoon Crescent Cups
These cups reinterpret crab rangoon as a creamy, savory filling in crescent dough, with a gourmet touch and no deep frying. Crunchy outside and cheesy inside, they are an upscale seafood choice. Easy to make, they’re perfect for cocktail parties or informal gatherings. They provide sophisticated flavor with ease.
- Use fresh or high-quality canned crab.
- Add a pinch of soy sauce for depth.
- Bake until crispy for the crunch outside.
The buttery dough and rich filling of the cups are sure to stand out. They are fast to make, ideal for hosts wanting something extraordinary. Serve warm to enjoy their creamy, savory goodness.

Crab Rangoon Crescent Cups
Equipment
- 1 Mini Muffin Tin Essential for shaping the crescent cups
- 1 Medium Mixing Bowl For preparing the crab rangoon filling
- 1 Whisk or Rubber Spatula For combining ingredients smoothly
- 1 Cutting Board and Knife For preparing green onion and garlic
- 1 Garlic Press For mincing garlic quickly and finely
Ingredients
Main
- 1 package Pillsbury Crescent rolls regular size
- 4 oz cream cheese softened
- ¼ cup mayonnaise
- 1½ teaspoons lemon juice
- ½ teaspoon Worcestershire sauce
- 1 green onion finely sliced
- 1 can 6oz crab meat, drained
- 1 clove garlic
- ½ cup & ⅓ cup mozzarella cheese divided
Instructions
- Preheat your oven to 375°F (190°C) and lightly grease a 12-cup mini muffin tin.
- In a medium mixing bowl, combine the softened cream cheese, mayonnaise, lemon juice, Worcestershire sauce, and finely minced garlic clove until smooth.
- Add the finely sliced green onion and the thoroughly drained crab meat to the cream cheese mixture. Stir in ½ cup of mozzarella cheese until well combined.
- Unroll the package of crescent rolls and separate the dough into 8 triangles.
- Gently press each crescent roll triangle into a mini muffin cup, forming a cup shape with the wider end covering the bottom and sides.
- Spoon an equal amount of the crab rangoon filling into each crescent cup.
- Sprinkle the remaining ⅓ cup of mozzarella cheese evenly over the tops of the filled cups.
- Bake for 12-15 minutes, or until the crescent dough is golden brown and the filling is bubbly.
- Remove the muffin tin from the oven and let the cups cool in the tin for a few minutes before transferring them to a wire rack.
- Serve warm, ideally with a side of sweet chili sauce or duck sauce for dipping.
Notes
Tips for Perfect Crescent Roll Appetizers
These methods ensure your appetizers are crispy and ready for a party while limiting moisture and making prep easy. They are meant to provide stress-free hosting with perfect results.
- Prevent sogginess: Pre-cook damp ingredients such as spinach or mushrooms. Include a layer of breadcrumbs or cheese for a moisture barrier.
- Make ahead: Build pinwheels or cups, cover, and chill for up to 24 hours. Bake fresh, with additional minutes if refrigerated.
- Perfect baking: Preheat the oven completely and employ parchment paper for uniform cooking. Brush with an egg wash for shine.
Crescent rolls are a culinary shortcut to elegant, flavorful appetizers. These 14 recipes, from savory rings to sweet braids, offer something for every occasion, blending simplicity with sophistication. With easy prep and practical tips, you’ll create memorable bites that make hosting effortless. Stock up, get creative, and enjoy dazzling your guests with these delicious creations.
")

