")

Hi, foodies and sentimentalists! There’s something wonderful about preserving recipes that are a big hug from the past. Easy, from-scratch recipes with love made from simple ingredients send us back to easy times grandma’s kitchen, where clattering pots were mixed with the anticipation of something incredible. These are less egotistical, but more sharing, heritage, and pleasure in food with those around us. Let us return to the innocence of home-made classics that never fade.
Classic recipes break away from the rhythm of life and ask us to be present. They remind us of family moments, festive seasons, and warm evenings around the family table. Every recipe is a story, a narrative passed on by one generation of the individuals who keep us tied to our origins. From comforting casseroles to slices of decadent pies, these dishes take pantry staples to a higher plane than their constituent parts with long-lasting flavor. They’re evidence that the finest dinners do not need to be fussy in order to leave an impact.
Join me on this delicious trip back in time as we recreate our grandmothers’ all-time favorite recipes. These are not recipes these are lovingly inspired by love, comfort, and enduring flavor. Baking for family, friends, or just yourself, these tried-and-true favorites will transport your kitchen to a bygone era. Break out the reliable mixing bowl, plug in the classics, and let’s recreate these vintage standards.

1. Make-Ahead Mac and Cheese
Nothing quite like the gooey, cheesy goodness of homemade mac and cheese, the casserole that immediately whisks you back to your mom’s or dad’s dinner evenings of your youth. Aww, sorry about the glow-in-the-box rubbish this is rich and comforting and full of flavour. It’s the sort of grub that feels like a hug from granny. You’ll never know why on earth you ever did eat anything else.
- Perfect for Nutty Weeknights: Make ahead and enjoy a warm weeknight gust or potluck dinner.
- Party Pleaser: Chewy texture guarantees party success at any gathering, big or small.
- Versatile: Substitute bacon, broccoli, or extra cheese to taste.
- Freezer Friendly: Double the recipe and freeze for a convenient future meal.
- Nostalgia Moment: Reminds one of family nights sitting around the table.
The most wonderful thing about this recipe is how make-ahead it is, so you can taste the taste of home cooking without all the last-minute rushes. Just assemble, refrigerate, and bake whenever you can held up its shape beautifully. Great for serving to a distressed friend or guests. The pasta and sauce together is perfection in every bite.
Whether you’re feeding a hungry family or craving a cozy night in, this mac and cheese delivers. It’s a reminder that the simplest ingredients can create the most memorable meals. Serve it hot, watch the cheese stretch, and let the nostalgia wash over you. This is comfort food at its finest, ready to become a new tradition in your home.
Creamiest Mac and Cheese
Equipment
- 1 Large Stockpot For boiling pasta
- 1 Large Saucepan For preparing the cheese sauce
- 1 Whisk Essential for a smooth roux and sauce
- 1 9×13 inch Baking Dish For assembling and baking
- 1 Box Grater or Food Processor For shredding cheese
Ingredients
Main
- cooking spray
- 1 16 ounce package elbow macaroni
- 4 teaspoons kosher salt divided
- 2 8 ounce packages sharp Cheddar cheese
- 6 tablespoons butter
- ⅓ cup all-purpose flour
- ¼ teaspoon ground mustard
- 3 ½ cups whole milk or more to taste
- 3 ounces cream cheese softened
- ½ teaspoon ground black pepper
- ⅛ teaspoon cayenne pepper Optional
Instructions
- Preheat the oven to 350 degrees F (175 degrees C). Spray a 9×13-inch baking dish with cooking spray.
- Bring a large pot of water to a boil. Add macaroni and 2 ½ teaspoons salt and cook, stirring frequently, for 5 to 6 minutes. Drain and set aside.
- Shred Cheddar cheese by hand or in a food processor; set aside.
- Melt butter in a large saucepan over medium heat. Whisk in flour and cook, whisking constantly, until smooth, 3 to 4 minutes. Whisk in mustard powder, then 3 ½ cups milk. Whisk occasionally until mixture comes to a simmer, then let simmer for 5 minutes.
- Add cream cheese and cook, stirring often, until thick, creamy, and smooth, about 5 minutes. Add remaining 1 ½ teaspoon salt, pepper, and cayenne.
- Stir in 2 cups shredded Cheddar. Turn off the heat and let cheese melt. Stir in cooked macaroni. Add up to ¼ cup milk if you feel like the mixture is too thick.
- Layer ½ of the pasta mixture in the bottom of the prepared baking dish. Top with 1 ½ cups Cheddar. Spread remaining pasta mixture over top and sprinkle with remaining Cheddar.
- Bake in the preheated oven until golden and bubbly, 25 to 30 minutes. Creamiest Mac and Cheese. Allrecipes
Notes

2. Sheet Pan Apple Crisp
Apple crisp is the perfect fall dessert, but warm spice richness is great any day. This sheet pan skimps to make the classic easy in no-fuss style faster than pie without sacrificing the same comfort. It’s perfect for using up apples on a pick-your-own excursion. Each bite is crunchy heaven, sweetness.
- Quick Prep: No messing with pie crust just layer and bake for instant gratification.
- Crowd-Pleaser: The crispy topping to a sheet pan’s capacity.
- Customizable: Swap the pears for apples or mix with some nuts for crunch.
- Serve Warm: Sprinkle with whipped cream or ice cream for a decadent treat.
- Seasonal Perfection: Perfect for fall parties or comfort food all year.
The pièce de résistance of this recipe: tender apples and buttery, crunchy streusel. Much less high-maintenance than pie but just as satisfying, topped with a crumble that everyone can’t help but inhale. Make it in large quantities to feed a crowd and watch them battle over the crust. A make-friends dessert.
This apple crisp is a flashback, to the good olden days when dessert wasn’t about excess but sharing and delight. How easy it is makes it a regular on busy days, but the taste is a fiesta. Serve hot, let the perfumes waft around your kitchen, and indulge in a slice of nostalgia that never grows old.
Sheet Pan Apple Crisp
Equipment
- 1 Rimmed Baking Sheet Standard half-sheet size is ideal for this recipe
- 2 Large Mixing Bowls One for apples, one for the topping
- 1 Pastry Blender Alternatively, use two knives or your fingertips for cutting in butter
- 1 Measuring Cups and Spoons
- 1 Rubber Spatula or Large Spoon For tossing apples and mixing topping
Ingredients
Main
- 12 apples cored and cut into 8 wedges
- ¾ cup brown sugar
- 2 teaspoons ground cinnamon divided
- 1 cup all-purpose flour divided
- ½ cup cold butter
- 1 ½ cups old-fashioned rolled oats
- 1 cup chopped walnuts
- ⅓ cup maple syrup
- 1 teaspoon pumpkin pie spice
- 1 teaspoon vanilla extract
- ½ teaspoon salt
Instructions
- Preheat oven to 350 degrees F (175 degrees C). Grease a rimmed baking sheet.
- Place apples wedges in a bowl. Sprinkle brown sugar and 1 teaspoon cinnamon over the apples and toss. Add 1/2 cup flour and mix well. Place apple mixture on the prepared baking sheet.
- Place the remaining 1/2 cup flour in another bowl. Cut in butter with 2 knives or a pastry blender until it’s the size of small peas. Add the remaining 1 teaspoon cinnamon, oats, walnuts, maple syrup, pumpkin pie spice, vanilla extract, and salt. Spoon mixture over the apples.
- Bake in the preheated oven until fruit mixture is bubbling, 45 to 50 minutes.
Notes

3. Beef Stew
Winter is here, and there’s nothing better than warming the cockles with a hot beef stew. This is one recipe made with everyday ingredients and transformed into a hug-in-a-bowl, comforting meal. It is a meal that fills your home with the scent of warm and cozy. Great for chilly winter nights, it’s comfort food in a bowl.
- Set and Forget: The slow cooker works its magic to produce fall-apart, melt-in-your-mouth beef.
- Comforting and Hearty: Loaded with protein and vegetables for a warm meal.
- Make-Ahead Magic: Prepare in the morning to use as a quick dinner night.
- Freezer-Friendly: Freeze leftovers for quick, comforting meals on-the-go.
- Timeless Comfort: Reminds one of grandma’s winter kitchen.
The. Slow cooker does everything for you with this stew, so no worry that flavors will get mixed up when you’re not around. The coarse beef falls apart and absorbs the flavorful broth. Busy lives or don’t want to be a nuisance with a meal are no issue with this. Every bite is a hug.
This is a testament to the loveliness of unhurried, unfrenzied cooking. It’s perfect for family dinner or comforting someone who could use a bit of comfort. Serve with a crusty loaf of bread to dip in the broth and find comfort through tradition calm your soul. This stew does not spoil.
Chef John’s Bigos (Polish Hunter’s Stew)
Equipment
- 1 Heavy Pot or Dutch Oven For simmering the stew
- 1 Large Skillet For browning meats and sautéing aromatics
- 1 Chef’s knife
- 1 Cutting Board
- 1 Large Stirring Spoon/Spatula
Ingredients
Main
- ¼ cup dried porcini mushrooms
- ½ cup warm water
- 2 tablespoons unsalted butter
- 1 small head green cabbage quartered and sliced
- 2 cups packed drained sauerkraut (not rinsed)
- 4 strips bacon cut into 1-inch pieces
- 1 pound pork shoulder cut into 1 ½-inch pieces
- 1 pound boneless beef chuck cut into 1-inch pieces
- 1 pound Polish sausage links sliced (or any other sausage)
- 1 large onion peeled and chopped
- 3 pitted prunes diced
- 1 cup dry red wine
- 1 teaspoon paprika
- 1 teaspoon dried thyme leaves
- 1 large bay leaf
- ½ teaspoon caraway seeds
- ¼ teaspoon allspice
- freshly ground black pepper
- salt to taste
Instructions
- Soak mushrooms in warm water in a bowl to soften, 10 to 15 minutes. Drain, then chop.
- Meanwhile, melt butter in a heavy pot or Dutch oven over medium-low heat. Add cabbage and sauerkraut; cook, stirring occasionally.
- Cook bacon in a skillet over medium-high heat until browned but not crisp; transfer to the pot with cabbage, leaving drippings in skillet.
- Add pork shoulder to skillet; sprinkle with salt. Cook and stir over medium-high heat until browned on all sides, 4 to 5 minutes; transfer to the pot. Add beef to skillet; sprinkle with salt. Cook and stir until browned, about 4 or 5 minutes; transfer to the pot. Add sausage to skillet; cook and stir until browned. Transfer to the pot.
- Reduce skillet heat to medium. Add onion; sprinkle with salt. Cook and stir until onion translucent and starts to color. Stir in mushrooms and prunes; cook and stir about 2 minutes. Pour in red wine; increase heat to medium-high. Simmer until wine is reduced and very little liquid remains. Transfer onion mixture to the pot; season with paprika, thyme, bay leaf, caraway seeds, allspice, black pepper, and salt. Stir to combine and evenly distribute.
- Cover pot tightly; simmer over medium-low heat until meat is tender, 1 to 1 ½ hours, stirring occasionally. Remove from heat; cool stew slightly. Refrigerate to let flavors blend, 8 hours to overnight.
- Place pot over low to medium-low heat; add splash of water. Bring stew to a low simmer, stirring occasionally; cook until hot, 10 to 15 minutes.
Notes

4. Lemon Meringue Pudding
Lemon meringue pudding brings a bright, citrusy twist to holiday dessert tables. While everybody is making a big deal about the pumpkin pie, grandma’s rebellion dessert is a tangy delight. It’s simpler than pie and no less attractive. The airy, fluffy meringue and airy pudding are heavenly.
- Easy Shortcut: Store-bought meringue cookies simplify the process.
- Cooling Flavor: Lemon cuts through rich holiday fare.
- Crowd-Pleaser: Sweet with large crowds with citrus flavor.
- Make-Ahead Option: Prepare the pudding ahead to serve at ease.
- Special Touch: Steals the show with richness of flavor.
The pie has all the lemon meringue pie flavor without any of the fuss of a crust. The tart curd and light top provide a dramatic texture contrast. It’s a great way of adding variety to party buffets. And it’s dashing with no muss. Whether you’re hosting Thanksgiving or a casual dinner, this pudding shines. It’s a nod to grandmas who dared to break tradition while keeping things delicious. Serve it chilled for a refreshing finish, and watch guests go back for seconds. This dessert is a zesty trip down memory lane.
Grandma’s Baked Rice Pudding with Meringue
Equipment
- 1 Saucepan For cooking the rice initially
- 1 Baking Dish Medium-sized for the pudding
- 1 Large Roasting Pan For the water bath (bain-marie)
- 2 Mixing Bowls One for pudding base, one for meringue
- 1 Electric mixer or whisk Essential for beating eggs and meringue
Ingredients
Main
- 1 cup water
- ½ cup uncooked white long-grain rice
- ¾ cup white sugar divided
- 2 large eggs separated
- 1 tablespoon cornstarch
- 1 pinch salt
- 2 ½ cups milk
- ½ cup raisins Optional
- 1 tablespoon fresh lemon juice
Instructions
- Bring water and rice to a boil in a saucepan over medium-high heat. Reduce heat to low, stir, and cover pan. Simmer until water is absorbed, about 20 minutes.
- Preheat the oven to 350 degrees F (175 degrees C).
- Beat ½ cup sugar and egg yolks together in a bowl. Beat in cornstarch and salt; continue beating. Gradually beat in milk. Stir in cooked rice, raisins, and lemon juice; transfer to a baking dish and place inside a larger baking pan. Fill larger pan with water 1 inch up the sides of the smaller baking dish.
- Bake in the preheated oven until pudding is creamy and most liquid is absorbed, stirring occasionally, about 1 hour, 30 minutes. Add more water to the larger baking pan as necessary to maintain the level.
- Meanwhile, beat egg whites in a glass or ceramic bowl until soft peaks form. Gradually beat in ¼ cup sugar; continue beating until meringue forms stiff peaks. Remove pudding from the oven, leaving it in the larger baking pan. Top pudding with meringue, swirling with a spoon to create soft peaks.
- Increase the oven temperature to 400 degrees F (200 degrees C).
- Bake in the preheated oven until meringue is golden, 8 to 10 minutes. Serve warm.
Notes

5. Tater Tot Breakfast Casserole
This tater tot breakfast casserole brings gourmet flair to grandma’s standby brunch staple. The tater tot crust gives the sausage-and-egg old standby a touch of high style. Rich, comforting, and wonderful for special mornings. A comfort food fiesta in every bite with crunch.
- Fun Twist: Tater tots add a tasty, crunchy topping to the trusty casserole.
- Make-Ahead Ease: Prepare ahead the night before for convenience-brunch convenience.
- Crowd-Pleaser: Pleases a crowd without fanfare and plenty of flavor.
- Versatile: Veggies or replace bacon with sausage to your liking.
- Party Time: Great for Easter or any party requiring comfort.
The combination of savory sausage, fluffy eggs, and golden tater tots is irresistible. It’s a dish that brings everyone to the table, eager for a hearty start to the day. Prep it ahead, and you’ve got more time to enjoy the moment. It’s brunch done right. This casserole is perfection-homey flavor mix of tasty, modern looks, and it’s a family favorite now. Holiday morning or Saturday morning heaven when you want a little something special. Hot, served, smiles will abound in the room. This one’s a cinch grandma-approved.

Tater Tot Breakfast Casserole
Equipment
- 1 9×13 inch Baking Dish Butter for greasing
- 1 Large Skillet For browning sausage and onions
- 1 Large Mixing Bowl For egg and cheese mixture
- 1 Wooden Spoon For breaking up sausage
- 1 Aluminum Foil For covering during initial bake
Ingredients
Main
- One 16-ounce bag frozen Tater Tots®
- Butter for the baking dish
- 1 tablespoon olive oil
- 1 pound spicy bulk breakfast sausage
- 1 medium onion very finely diced
- 1 cup milk
- 1/2 cup half-and-half
- 1/4 teaspoon seasoned salt
- 1/4 teaspoon cayenne
- 4 large eggs
- 1 red bell pepper very finely diced
- 1 green bell pepper very finely diced
- 2 cups grated Cheddar cheese
- 1 cup grated pepper jack cheese
- Kosher salt and freshly ground black pepper
Instructions
- Line up the tater tots in a buttered 9-by-13-inch baking dish.
- Add the olive oil to a large skillet over medium heat. Add the sausage and onion and cook, breaking the sausage up with a wooden spoon, until browned and cooked through, 8 to 10 minutes. Set aside to cool slightly, then sprinkle it over the tater tots.
- In a large bowl, mix the milk, half-and-half, seasoned salt, cayenne, eggs, bell peppers, half of both cheeses and some salt and pepper. Pour over the tots and sausage mixture, then top with the rest of the cheese. Cover with foil and refrigerate overnight.
- Preheat the oven to 350 degrees F.
- Bake, covered, for about 25 minutes. Remove the foil and continue to bake until the cheese is brown and bubbly and the casserole is cooked through, another 20 to 35 minutes. Cut into squares and serve.
Notes

6. Chicken Noodle Soup
Chicken noodle soup is comfort food, soothing body and soul. Simple ingredients yield rich, warm broth that’s a big hug from the inside out. A cold-weather or cold-and-flu standby, it’s an old friend that never grows old. Each bite is a step back in time.
- Simple to Prepare: Simple ingredients for easy prep.
- Comfort Medicine: Ideal for colds or when feeling under the weather.
- Family Favorite: Children and adults alike adore it for the soothing taste.
- Customizable: Place extra veggies or spices according to your preference.
- Quick Prep: Shredding chicken is the only challenging aspect otherwise, it’s a breeze.
The elegance of this dish is that it takes the bare simple, and it takes it dead serious. Less is more. Chicken, noodles, and umami soup are so lovely together. It is one of those dishes you can warm your very soul with. It is one of those dishes that is just perfect for any day that just needs a little extra love.
Whether you’re nursing a cold or craving nostalgia, this soup delivers. It’s a reminder that the best recipes don’t need to be complicated to be unforgettable. Serve with crackers or warm bread, and let the comfort wash over you. This is grandma’s love in a bowl.

Butternut Squash Noodle Soup with Turkey
Equipment
- 1 Large stockpot or Dutch oven For simmering the soup
- 1 Cutting Board
- 1 Chef’s knife For chopping vegetables and preparing squash
- 1 Vegetable Peeler Essential for peeling butternut squash
- 1 Spiralizer or Julienne Peeler For creating uniform butternut squash noodles; a sharp knife can also be used for careful julienning
Ingredients
Main
- 6 cups low-sodium chicken broth
- 3 ribs celery chopped
- 0.5 white onion chopped
- 1 teaspoon chopped garlic
- 0.75 teaspoon Mexican oregano
- 0.25 teaspoon ground chipotle chile pepper or to taste
- 0.75 butternut squash peeled and cut into noodle shapes
- 2 cups diced cooked turkey
- 1 teaspoon chopped fresh cilantro or more to taste
Instructions
- Peel and chop the celery and white onion. Mince the garlic. Peel the butternut squash and carefully cut it into thin noodle shapes using a spiralizer, julienne peeler, or a sharp knife.
- In a large stockpot or Dutch oven, combine the low-sodium chicken broth, chopped celery, chopped white onion, minced garlic, Mexican oregano, and ground chipotle chile pepper.
- Bring the mixture to a boil over medium-high heat.
- Once boiling, reduce the heat to medium-low, then add the prepared butternut squash noodles to the pot.
- Continue to simmer gently for about 8-10 minutes, or until the butternut squash noodles are tender-crisp, being careful not to overcook them to maintain their integrity.
- Stir in the diced cooked turkey and allow it to heat through completely, which should take just a few minutes.
- Stir in the fresh cilantro. Taste the soup and adjust seasonings as needed, adding more chipotle for heat or salt to preference.
- Ladle the hot soup into individual serving bowls.
- Garnish with additional fresh cilantro if desired before serving warm.
Notes

7. Old-Fashioned Peanut Butter Cookies
Peanut butter cookies are the second vintage bake, conjuring up after school snacks and cozied-up nighttime nights. Whipped up from store cupboard supplies, they’re ready and raw in an instant. Their sweet-salt taste is heaven with each mouthful. They are a vintage snack.
- Pantry-Friendly: Built using the stuff you most probably already have to hand.
- Quick to Make: Great for last-minute baking tasks.
- Kid-Approved: The ultimate best mate of any kid.
- Eternal Look: Fork-cross gives it its stamp of approval.
- Convenient Snack: Perfect for the lunchbox, coffee shop break point, or after-hours treat.
The best quality of these cookies is that they are simple. Mix, form, and bake in a snap for a dessert. Chewy consistency and full-strength peanut taste always hits the spot. It’s a recipe that tastes like mom’s hug. Whether to give them to the neighbors or to keep them all to yourself, these cookies are a winner. They’re perfect for a daily snack, holiday cookie exchange, and anything in between. Whip up a batch, grab a glass of milk, and take a trip back in time to your childhood. These are cookies the way they ought to be.
Old Fashioned Peanut Butter Cookies
Equipment
- 1 Electric Mixer
- 1 Large Mixing Bowl
- 2 Baking Sheets
- 1 Parchment Paper
- 1 Cooling Racks
Ingredients
Main
- 3 cups all-purpose flour
- 1 teaspoon baking powder
- 1 teaspoon salt
- 1 cup unsalted butter softened
- 1 cup packed brown sugar
- 1 cup white sugar
- 2 eggs
- 2 cups peanut butter chips
- 1 cup peanut butter
- 2 teaspoons vanilla extract
Instructions
- Preheat oven to 350 degrees F (175 degrees C). Line 2 large baking sheets with parchment paper.
- Mix flour, baking powder and salt in a medium bowl.
- In a large bowl, beat butter, peanut butter, and vanilla with an electric mixer until well blended. Beat in both sugars. Scrape down the sides of the bowl. Stir in half of the dry ingredients into the mixture. Add eggs one at a time, blending well after each addition. Mix in remaining ingredients. Stir in peanut butter chips.
- For each cookie, roll 1 heaping tablespoon full of dough into 1 3/4 inch diameter ball. Arrange balls 2 1/2 inches apart on prepared baking sheets. Using the back of fork, flatten dough balls and form a crosshatch on tops.
- Bake cookies until dry on top, about 15 minutes.
- Cool cookies on baking sheets for 5 minutes. Using a spatula, transfer cookies to cooling racks to cool completely.
Notes

8. Slow-Cooker Chicken and Biscuits
This slow-cooker biscuits and chicken dish is the epitome of comfort food, offering a rich, creamy base topped with fluffy biscuits. It’s like a warm hug in a bowl, perfect for busy days due to its simple preparation. This ultimate grandma-style recipe delivers hearty, nostalgic flavors with minimal effort. Ideal for cozy family meals, it’s both satisfying and effortlessly comforting.
- Hands-Off Cooking: The slow cooker makes it a set-it-and-forget-it meal.
- Hearty and Satisfying: A whole meal of chicken, vegetables, and biscuits.
- Crowd-Pleaser: Great for family dinner or potlucks.
- Rich Gravy: Low heat simmer yields rich, full-flavored sauce.
- Cozy Ambiance: Fills your home with sensual aromas.
Slow cooker transforms simple ingredients into a rich, decadent meal. Chicken and veggies are fall-apart tender in a rich broth topped with golden biscuits. Rich-tasting, not pretentious. Perfect for snowy nights or dinner parties. This recipe does comfort food justice and brings it into the current age. It’s perfect for a party or leftovers all week. Serve hot, allow biscuits to get soggy with gravy, and sit back and watch everyone devour it. This is comforting food you can consume that’s also sentimental.
Slow Cooker Chicken and Dumplings
Equipment
- 1 Slow Cooker (6-quart or larger)
- 1 Cutting Board
- 1 Chef’s knife
- 1 Large Spoon or Ladle For stirring and serving
Ingredients
Main
- 4 skinless boneless chicken breast halves
- 2 tablespoons butter
- 2 10.5 ounce cans condensed cream of chicken soup
- 1 medium onion finely diced
- 1 10 ounce package refrigerated biscuit dough
- 2 cups water or as needed to cover
Instructions
- Gather the ingredients. Dotdash Meredith Food Studios
- Place chicken, condensed soup, onion, and butter in a slow cooker. Add enough water to cover; stir well. Cover and cook on High for 5 to 6 hours. Dotdash Meredith Food Studios
- About 30 minutes before serving, tear biscuit dough into pieces. Place dough in the slow cooker. Cook until dough is no longer raw in the center. Dotdash Meredith Food Studios
- Serve hot and enjoy! DOTDASH MEREDITH FOOD STUDIOS
Notes

9. Pimiento Cheese Dip
Pimiento cheese dip, a quintessential Southern treat, blends rich, tangy flavors into an irresistibly addictive spread. Perfect for dipping or spreading, it’s a vibrant party starter at any family gathering. This simple snack is quick to prepare and even quicker to disappear. Grandma’s no-fuss recipe delivers bold, comforting taste without any tricks.
- Multi-Use: Dip or sandwich and cracker spread.
- Quick Prep: Prepares in minutes with easy ingredients.
- Showstopper: Serve in a bread boule for ultimate drama.
- Crowd Favorite: disappears in seconds from every gathering or social occasion.
- Southern Charm: Provides a hint of history with every bite.
This dip is so thick and rich, everyone who’s at any party will be. Spread it on bread or use as a veggie dip and it’ll be a hit. It’s easy enough for a night at home but sophisticated enough for company. They’ll all want the recipe. Bring this to the next party, and watch it steal the show. It’s a love song to the best eats that they’re easiest, with love and flavor to spare. Serve with a smile, and good times roll. This dip is Southern magic brewing.
Pimiento Cheese and Tomato Bites
Equipment
- 1 Mixing Bowl Medium-sized for combining ingredients.
- 1 Rubber spatula or spoon For mixing and folding.
- 1 Measuring Spoons and Cups For accurate ingredient portions.
- 1 Grater (Optional) If cheeses are not pre-shredded or for grating fresh onion.
- 1 Paring Knife For halving cherry tomatoes.
Ingredients
Main
- ½ 8 ounce package softened cream cheese
- ¼ cup mayonnaise
- 1 tablespoon finely grated onion
- 1 teaspoon Worcestershire sauce
- 1 teaspoon lemon juice
- ¾ teaspoon dried mustard
- ¾ teaspoon hot sauce
- ½ teaspoon white sugar
- ¼ teaspoon kosher salt
- ¼ teaspoon ground black pepper
- 1 4 ounce jar diced pimiento peppers, drained
- 3 ounces shredded sharp Cheddar cheese
- 3 ounces shredded extra-sharp white Cheddar cheese
- 30 buttery crackers
- 1 pint cherry tomatoes halved
Instructions
- Stir together cream cheese, mayonnaise, onion, Worcestershire, lemon juice, dried mustard, hot sauce, sugar, kosher salt, and pepper in a bowl. Fold in diced pimiento and cheeses. Spread 1 tablespoon cheese mixture onto each cracker. Top with cherry tomato halves.
Notes

10. Hot Honey Peach Upside-Down Cake
This spicy peach upside-down cake reimagines a classic dessert with honey and spicy peaches, baked into a sweet, caramelized delight. Its stunning appearance belies its simple preparation, making it a perfect centerpiece for any occasion. The innovative blend of heat and sweetness creates a memorable flavor profile. This showstopping cake is sure to impress guests with every heavenly bite.
- Wow Factor: Spicy-sweet hot honey adds an interesting flavor kick.
- Beautiful Appearance: Flipping the cake is a gorgeous mosaic of peaches.
- Easy Prep: Simpler than it appears, great for beginners.
- Party Perfection: Ideal for dinner parties or summer barbecues.
- Nostalgic Twist: The classic old-time recipe with a thrilling new twist.
The peaches and spicy honey are heaven. They blend while baking to produce a light, airy cake that can’t be ignored. It’s the party hit that never disappoints your party guests. Every serving is a summer and nostalgia delight. Whether you’re hosting a fancy dinner or treating yourself, this cake delivers. It’s a perfect blend of old-school charm and modern flair. Serve it warm, and let the compliments roll in. This dessert is destined to become a new favorite.

Hot Honey Peach Upside-Down Cake
Equipment
- 1 9-inch Round Cake Pan Preferably non-stick, or line with parchment paper for easy release.
- 1 Electric Stand Mixer Or a hand mixer, for creaming butter and sugar effectively.
- 2 Large Mixing Bowls One for dry ingredients, one for wet.
- 1 Set of Measuring Cups and Spoons
- 1 Rubber Spatula For scraping bowls and folding ingredients.
Ingredients
Main
- Cooking spray
- 1/2 cup hot honey such as Mike’s
- 1/8 tsp. crushed red pepper optional
- 3/4 cup 1 1/2 sticks unsalted butter, softened, divided
- 3/4 tsp. kosher salt divided
- 2 cups fresh or thawed frozen peach slices from 3 fresh peaches or a 16-oz. pkg. frozen slices
- 3/4 cup 150 g granulated sugar
- 2 large eggs at room temperature
- 2 tsp. pure vanilla extract
- 1 1 /2 cups 180 g all-purpose flour
- 1 1/2 tsp. baking powder
- 1/2 tsp. freshly grated or ground nutmeg
- 3/4 cup whole milk
- Vanilla ice cream for serving (optional)
Instructions
- Preheat oven to 350°F (175°C). Grease a 9-inch round cake pan with cooking spray and set aside.
- In a small bowl, combine hot honey and crushed red pepper (if using).
- Melt 1/4 cup (1/2 stick) of butter with 1/4 tsp. kosher salt in the prepared cake pan over medium-low heat, swirling to coat the bottom.
- Pour the hot honey mixture into the pan and arrange peach slices evenly over it.
- In a large bowl, cream the remaining 1/2 cup (1 stick) softened butter, granulated sugar, and 1/2 tsp. kosher salt with an electric mixer until light and fluffy. Beat in eggs one at a time, then vanilla extract.
- In a separate bowl, whisk together flour, baking powder, and nutmeg.
- Gradually add the dry ingredients to the wet ingredients, alternating with whole milk, mixing until just combined.
- Carefully spoon the cake batter over the peach layer in the pan, spreading evenly.
- Bake for 50-60 minutes, or until a wooden skewer inserted into the center comes out clean.
- Let cool in the pan for 10-15 minutes, then invert onto a serving plate. Serve warm, optionally with vanilla ice cream.
Notes

11. Bacon-Wrapped Dates With Goat Cheese
Bacon-wrapped goat cheese-filled dates combine sweet, savory, and rich flavors for a gourmet treat that outshines traditional snacks. Easy to prepare, they deliver a burst of deliciousness that elevates any gathering. These irresistible bites disappear quickly at parties, delighting guests with their sophisticated taste. Every bite offers a perfect balance of crispy bacon, creamy goat cheese, and sweet dates.
- Flavor Blast: Sweet dates, smoky bacon, and goat cheese tang all combined.
- Fast Assembly: Assembled fast, but perfect on a platter.
- Party Favorite: Holiday perfect, cocktail party, or night out in town.
- Crowd-Pleasing: Clear the table ahead of time.
- Elegant Ease: Complicated flavor without spending hours in the kitchen prepping.
The combination of textures chewy dates, crispy bacon, creamy cheese is unbeatable. They’re great for parties or turning a night at home into an evening. They’re the contemporary version of grandma’s appetizer shortcut. Double the recipe, because they’ll be gone in an instant.
This is proof that sometimes the most basic of ingredients will be capable of doing something amazing. It’s a party appetizer to serve that everyone will be standing in a circle waiting for with great little morsels. Bring it to the next party, and people will be abuzz. These are tiny packets of heaven in themselves.
Bacon-Wrapped Dates
Equipment
- 1 Baking Sheet With a wire rack for optimal bacon crisping and grease drainage.
- 1 Paring Knife For carefully slicing dates.
- 1 Cutting Board
- 32 Toothpicks Approximately 32 for securing the bacon.
Ingredients
Main
- 1 pound pitted dates
- 4 ounces blue cheese
- 1 pound sliced smoked bacon cut in half
Instructions
- Preheat the oven to 375 degrees F (190 degrees C).
- Slice dates in half and open them up. Pinch off pieces of blue cheese and place them into the center of dates; press date halves together to close. Wrap each date with a half-slice of bacon and secure with a toothpick. Arrange in a baking dish or on a baking sheet with sides to catch any grease.
- Bake in the preheated oven until bacon is crisp, 30 to 40 minutes. Turn dates over after the first 20 minutes for even cooking.
Notes
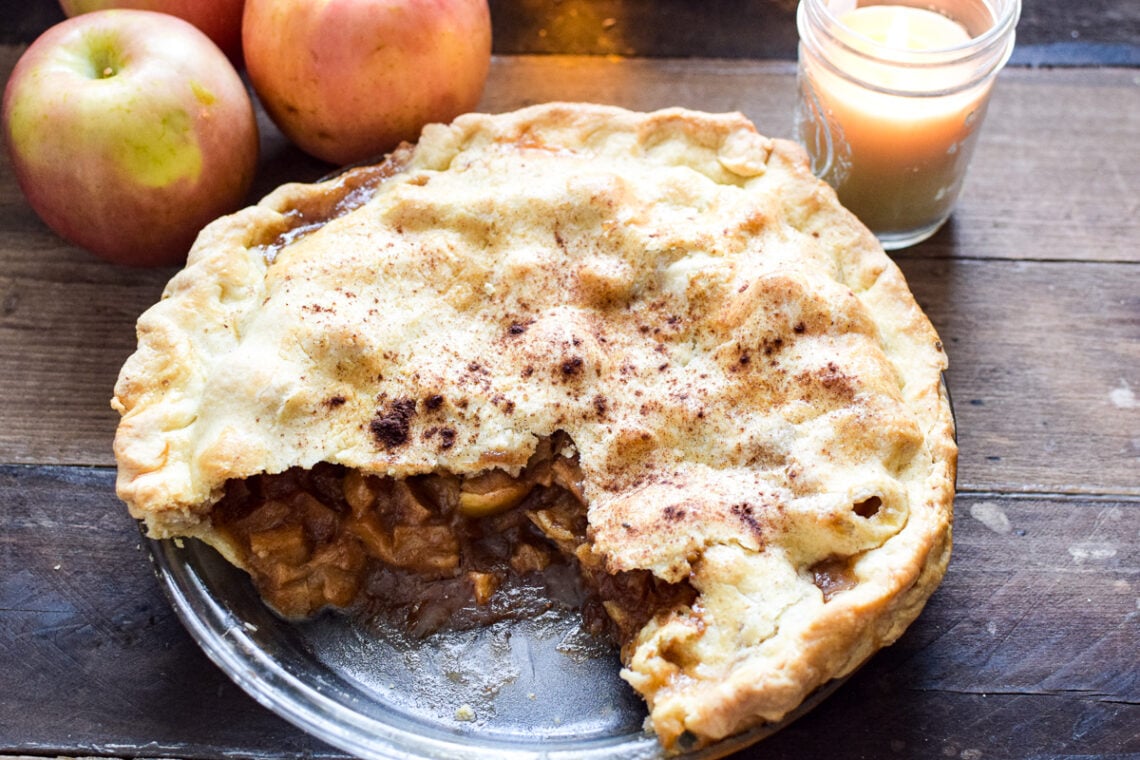
12. Old-Fashioned Apple Pie
Apple pie, a timeless comfort food, features a warm, cinnamon-spiced apple filling encased in a flaky, crunchy pastry. It’s a staple of family celebrations and home kitchens, evoking nostalgia and togetherness. This classic dessert never disappoints, delivering a perfect balance of sweet and spicy flavors. Every bite embodies the essence of an American culinary tradition.
- Timeless Appeal: Perfect combination of flaky butter crust and juicy apples.
- Holiday Star: Perfect for Thanksgiving or any holiday.
- Make-Ahead Option: Prepare dough ahead for convenient baking.
- Flexible Serving: Irresistible warm over ice cream or cold over coffee.
- Legacy Recipe: Handed down generation to generation for a reason.
Secret to the pie is the marriage of flavor and texture. The golden crust yields to soft, cinnamon-spiced apples, pure heaven. It’s work of love every minute of which is worth it. Baking it for me is time traveling. Serve this pie at the next gathering, and see them all go back for more. It’s evidence that the most mundane of delicacies are most frequently the ones that stand the test of time. Serve warm, and feel the memories flood over you. This is grandma’s legacy, simply baked.
Old-Fashioned Apple Pie
Equipment
- 1 9-inch Pie plate
- 1 Large Mixing Bowl
- 1 Paring Knife For peeling and coring apples
- 1 Cutting Board
- 1 Measuring Spoons and Cups
Ingredients
Main
- 1 14.1 ounce package pastry for a double-crust 9-inch pie
- 7 cups peeled cored and sliced apples
- 1 cup white sugar
- 3 tablespoons all-purpose flour
- 1 teaspoon ground cinnamon
- ¼ teaspoon salt
- ⅛ teaspoon ground nutmeg
- 2 tablespoons butter
Instructions
- Preheat the oven to 425 degrees F (220 degrees C). Line a 9-inch pie plate with bottom crust.
- Combine apples, sugar, flour, cinnamon, salt, and nutmeg in a bowl. Place mixture into the prepared pie plate. Dot with butter. Cover with top crust and seal. Cut holes in top crust to allow venting.
- Bake in the preheated oven for 10 minutes.
- Reduce the oven temperature to 300 degrees F (150 degrees C) and bake until crust is golden brown and apples are tender, 40 for 50 minutes. Cool and serve.
Notes

13. Best Banana Bread
Grandma’s banana bread elevates overripe bananas into a heavenly, moist, and highly addictive treat. Its rich, comforting flavor makes it perfect for breakfast, a quick snack, or as a thoughtful hostess gift. This beloved recipe stands out as the ultimate comfort food, cherished for its nostalgic taste. Every bite delivers a delightful blend of sweetness and warmth.
- Pantry Staples: Is made with ingredients that you may already have on hand in the pantry.
- Customizable: You can add chocolate chips, walnuts, or cinnamon to give it an extra kick.
- Cozy Aroma: Produces a warm and cozily aroma for your home.
- Easy to Share: Great to share as a tasty treat with the neighbors or friends.
- Timeless Treat: A timeless favorite that will definitely create smiles on each face.
The yummy banana taste and tender crumb of this bread have made it irresistibly chic. Easy to prepare, but has the taste of a true off-the-wall treat every time. Bake for a nourishing morning or lunchtime lift. A recipe warm home and heart.
Regardless of your level of baking experience, this banana bread is foolproof. It’s pure genius for disposing of your less-than-fresh bananas and producing something everyone will love devouring. Slice it nice and thick, butter it well, and experience the magic of nostalgia. That’s the beauty of baking magic.
Hawaiian Coconut-Banana Bread
Equipment
- 3 Loaf Pans 9×5-inch metal, glass, or silicone
- 2 Large Mixing Bowls
- 1 Whisk
- 1 Measuring Cups and Spoons
- 1 Wire Rack
Ingredients
Main
- 1 ¼ cups coconut flour
- 1 ¼ cups all-purpose flour
- 1 cup xylitol
- 1 cup coconut sugar
- 2 tablespoons ground flaxseed meal
- 2 teaspoons baking soda
- 1 teaspoon salt
- 3 ½ cups mashed overripe bananas
- 1 cup unsalted sweet cream butter softened at room temperature
- ½ cup coconut milk
- 4 large eggs
- 1 cup chopped macadamia nuts Optional
Instructions
- Preheat the oven to 350 degrees F (175 degrees C). Grease 3 metal or glass 9×5-inch loaf pans or use ungreased silicone pans.
- Mix coconut flour, all-purpose flour, xylitol, coconut sugar, flaxseed meal, baking soda, and salt together in a large bowl.
- Blend bananas, butter, coconut milk, and eggs in another large bowl. Add dry ingredients and whisk thoroughly until there are no lumps. Fold in macadamia nuts. Pour batter into the prepared loaf pans.
- Bake in the preheated oven until a toothpick inserted into the center comes out clean, about 40 minutes. Cool briefly on a wire rack and then remove from the pans and let cool completely. Serve warm.
Notes

14. Creamy Chicken and Rice Casserole
This tasty chicken and rice casserole is a warm, comforting casserole perfect for a crowd. It’s the kind of casserole your grandmother makes in a desperation attempt to get everyone seated at the table. Easy to prepare, it’s full of flavor. Perfect for family dinners or potlucks, it’s a favorite classic.
- One-Pan Wonder: Whole meal in one pan including chicken, rice, and vegetables.
- Make-Ahead Convenience: Prepare ahead for crazy nights or parties.
- Freezer Friendly: Have leftovers on hand for easy, warm meals.
- Crowd Pleaser: Everyone is never satiated of the rich, creamy flavor.
- Heartwarming: A warm hug from Grandma’s kitchen is on its way.
The comforting sauce and rice are enough for this casserole to be a standalone meal. This is a simple meal that’s full of massive flavor and comfort. Perfect just-in-time solution for nutty weeknights or dinner to deliver over to suffering neighbors. Home is home with every bite. This casserole is the best proof of the healing power of grandma, body and soul. It is ideal for any gathering, whether it is plain meals or Christmas feast. Serve warm, and plates will be wiped in seconds. It is comfort food that can never go astray.

Chicken Broccoli Casserole
Equipment
- 1 9×13 inch Baking Dish
- 1 Large Pot For cooking chicken
- 1 Medium Pot For cooking broccoli
- 1 Large Mixing Bowl
- 1 Box Grater / Shredding Forks For cheese and chicken
Ingredients
Main
- Nonstick cooking spray or butter for the baking dish
- 4 boneless skinless chicken breasts
- Kosher salt and freshly ground black pepper
- 1 medium head broccoli cut into small florets
- 2 cups cooked white rice
- One 10-ounce can condensed cream of chicken soup
- 1 cup sour cream
- 1/2 cup mayonnaise
- 1 tablespoon lemon juice
- 10 ounces Cheddar grated (about 2 1/2 cups)
Instructions
- Preheat the oven to 350 degrees F. Grease a 9-by-13-by-2-inch baking dish with nonstick cooking spray or butter.
- Place the chicken in a large pot with water to cover. Add some salt, bring to a boil, then reduce the heat to a low simmer and cook the chicken until tender, about 45 minutes. Drain the chicken, cover, and refrigerate until cool, or up to 24 hours. Shred.
- Meanwhile, bring a medium pot of generously salted water to a boil. Add the broccoli florets, and boil until crisp-tender, 2 to 3 minutes.
- Spread the rice in an even layer in the baking dish. Make a second layer with the broccoli. In a large bowl, mix the chicken soup, the sour cream, mayonnaise, lemon juice, shredded chicken, half the Cheddar and some salt and pepper. Pour the mixture over the broccoli and top with the remaining Cheddar. Bake for 40 minutes; let stand for 5 minutes before serving.
Notes
Final Thoughts
These old recipes are not something to wolf down food for the belly, yes, but food for the soul as well. They’re a link to the past, a testament to appreciation of work and love our grandmothers put into their recipes. From comforting casseroles to tart desserts, every recipe is a testament to family, heritage, and sharing time. They remind us it’s in the kitchen memories are created, whether baking a cake for a party of a hundred or an evening of tranquility together. Then go dig out your mixing bowls, indulge in these flash-back flavors, and take home the nostalgia of comfort. Tasty food, happy memories, and the pleasure of cooking in the heart here’s to that.


