

Summer is just around the corner, as you know. That means barbecue season is upon us. This time of year, backyard parties are waiting for us. Enjoying the sunshine is part of these days, and serving up a delicious dish is always important.
Trendy dishes can certainly add fun to a party, but classic dishes are undeniably delicious. We’re talking about those slightly outdated dishes that your grandmother might have made in the past. They may seem a bit unremarkable to some. Trust us, there’s a reason they’ve become classics.
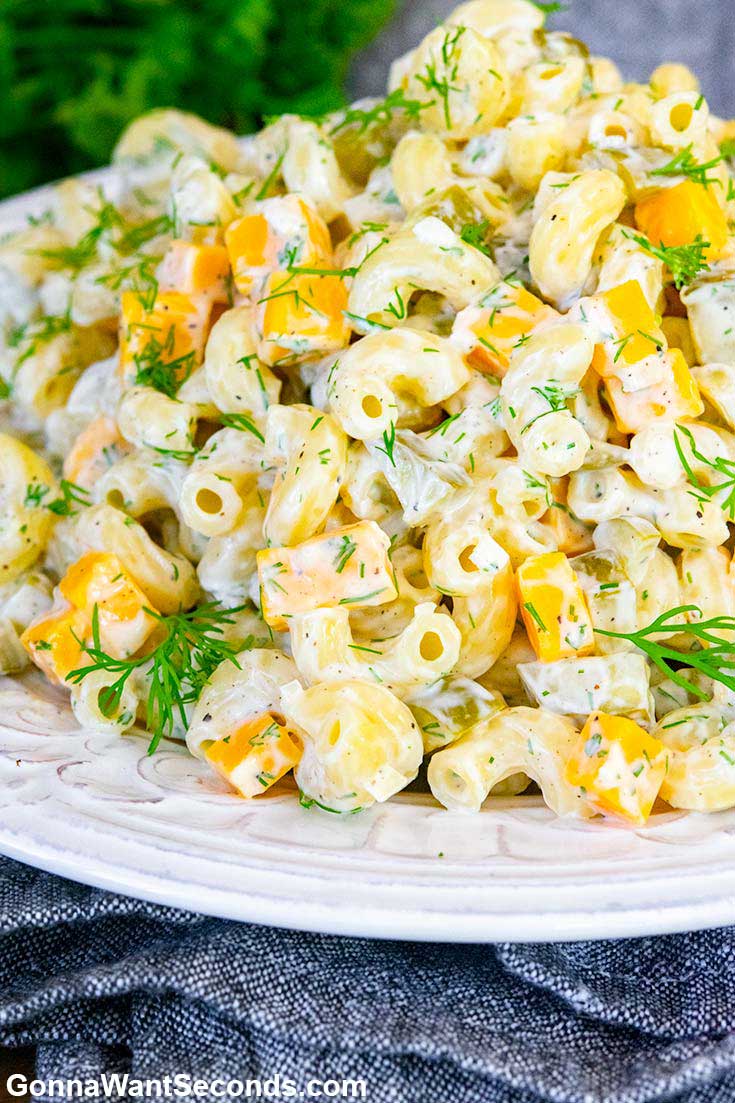
Pickle lovers, forget everything you know about pasta salad. Try Dill Pickle Pasta Salad, which brings a tangy flavor to the table. Unlike ordinary side dishes, this dish can sometimes even outshine hot dogs. I think that’s quite an impressive compliment at any barbecue party.
Imagine it standing out even next to juicy grilled meat. What makes this dish so special? I believe it’s because it features not just one type of dill, but three high-quality varieties. Fresh dill is certainly included. You might also spot dill cheese, and the classic dill pickles are the perfect finishing touch. Once you try it, pickle enthusiasts will definitely love it.
Red Slaw is a trusted hot dog condiment that is like the best friend hot dogs have always been missing. This condiment never goes out of style, no matter when or where. It’s no wonder it remains a popular choice—just imagine the perfect blend of tangy flavor and smoky hot dogs.
What’s the secret ingredient in this sauce? It’s a blend of tomato sauce, mustard, and chili sauce. That’s the recipe. It always delivers that classic tangy flavor. The tomato sauce adds a touch of sweetness, while the chili sauce provides just the right amount of heat—never too spicy. That’s the ultimate trio of ingredients.
Dill Pickles
Equipment
- 1 1-Gallon Crock Food-grade fermentation vessel
- 1 Pitcher For mixing brine
- 1 1-Gallon Ziptop Bag For weighting pickles
- 1 Measuring Cups and Spoons
- 1 Knife or Scissors For trimming cucumber ends
Ingredients
Main
- 5 1/2 ounces pickling salt approximately 1/2 cup
- 1 gallon filtered water
- 3 pounds pickling cucumbers 4 to 6-inches long
- 1 tablespoon black peppercorns
- 1 tablespoon red pepper flakes
- 2 cloves garlic crushed
- 1 teaspoon dill seed
- 1 large bunch dill
Instructions
- Combine the salt and water in a pitcher and stir until the salt has dissolved.
- Rinse the cucumbers thoroughly and snip off the blossom end stem. Set aside.
- Place the peppercorns, pepper flakes, garlic, dill seed and fresh dill into a 1-gallon crock. Add the cucumbers to the crock on top of the aromatics. Pour the brine mixture over the cucumbers in order to completely cover. Pour the remaining water into a 1-gallon ziptop plastic bag and seal. Place the bag on top of the pickles making sure that all of them are completely submerged in the brine. Set in a cool, dry place.
- Check the crock after 3 days. Fermentation has begun if you see bubbles rising to the top of the crock. After this, check the crock daily and skim off any scum that forms. If scum forms on the plastic bag, rinse it off and return to the top of the crock.
- The fermentation is complete when the pickles taste sour and the bubbles have stopped rising; this should take approximately 6 to 7 days. Once this happens, cover the crock loosely and place in the refrigerator for 3 days, skimming daily or as needed. Store for up to 2 months in the refrigerator, skimming as needed. If the pickles should become soft or begin to take on an off odor, this is a sign of spoilage and they should be discarded.
Notes

Can you really call it a backyard barbecue party without baked beans? Seriously, an outdoor gathering without baked beans just feels like something is missing. A pot of steaming hot baked beans is always a must. There’s a reason this side dish is a classic.
It’s all about the sweet and savory sauce, with tender beans inside. It’s pure comfort food. Baked beans are also very time-efficient to prepare, as many ready-to-eat options are available at the supermarket. All you need to do is pour them into a pot and heat them for a few minutes.
Bacon-Ranch Pasta Salad is a brand-new pasta salad. This salad takes deliciousness to a whole new level. The golden combination of bacon and ranch dressing is surprisingly stunning. This salad recipe also includes fresh cherry tomatoes, whose sweetness perfectly balances the richness of the dressing.
Honestly, this salad is so delicious it will disappear from the table in no time. Prepare some for your next gathering, and you’ll receive rave reviews from your friends.

Ah, hush puppies always have a satisfying feel to them, making them taste just right. I don’t think anything can compare to the classic hush puppy recipe. Just looking at them brings to mind their crispy exterior and soft interior. You can eat them one by one, and they can be enjoyed elegantly even while waiting in line. Every bite is a delicious treat. They melt quickly in your mouth, providing a pleasant texture. Whether you cook them on the stove or in a frying pan, it’s all good.
Just place a basket of these little treats on the table. Their charm speaks for itself—“we guarantee they’ll be gone in no time.” They’re truly addictive, and sharing them with friends is the best part.
When you think of summer and barbecue parties, what images come to mind? Classic grilled corn on the cob is sure to be one of them. It’s almost tailor-made for sunny outdoor moments. Grilling corn perfectly brings out its natural sweetness while imparting a delightful smoky, caramelized flavor.
It’s simple, yet always delicious. Simple things are often the best. This vibrant vegetable pairs perfectly with a hot dog party, with the smoky, sweet corn complementing the salty, savory meats. Vegetables are always an indispensable part of the table.
Hush Puppies
Equipment
- 1 Large, deep cast-iron skillet or Dutch oven For deep-frying
- 1 Deep-Fry Thermometer To monitor oil temperature
- 1 Medium Mixing Bowl For preparing batter
- 1 Whisk For combining ingredients
- 1 Slotted Spoon or Spider For removing fried hush puppies
Ingredients
Main
- Vegetable oil for deep-frying
- 3/4 cup yellow cornmeal
- 1/2 cup all-purpose flour
- 2 teaspoons sugar
- 1 teaspoon baking powder
- 1/2 teaspoon baking soda
- Kosher salt
- 1/2 cup buttermilk
- 2 large eggs
- 2 tablespoons unsalted butter melted and cooled
- 3 scallions finely chopped
Instructions
- Heat 2 inches of oil in a large, deep cast-iron skillet or Dutch oven to 365 degrees F.
- Whisk together the cornmeal, flour, sugar, baking powder, baking soda and a good pinch of salt in a medium bowl. Beat in the buttermilk and eggs until combined, then stir in the melted butter and scallions to make a thick batter.
- In two batches, drop the batter by the tablespoonful into the hot oil. Fry, turning once, until crisp and golden, about 3 minutes per batch. Drain on paper towels; season immediately with salt.
Notes

Everyone is familiar with kimchi sauce, but why not give Fried Pickle Chips a try? They offer a more unique texture and flavor profile, combining crispiness with a tangy kick. Instead of adding kimchi sauce to your hot dog, why not try these as a side dish? Adding a few slices to your hot dog can provide an extra crunch and flavor. It’s still the kimchi tang you love, but with an added crispy texture.
Only frying can perfectly achieve this texture, and they pair well with any hot dog toppings. Add ketchup and mustard, and everything complements them perfectly.
Crispy snacks at a barbecue party can also be made with vegetables, such as zucchini. Air-Fried Zucchini Chips sound much healthier than potato chips. And you don’t have to worry about soggy side dishes. Their key features are “milky aroma, crispiness, and salty flavor.” An air fryer can make potato chips crispy without using a lot of oil. This party snack lets you enjoy it without feeling too guilty.
Deep-Fried Pickle Chips
Equipment
- 1 Deep Pot or Saucepan For heating the oil
- 1 Thermometer Crucial for monitoring oil temperature
- 1 Baking Sheet with Wire Rack For draining fried pickles
- 3 Mixing Bowls (various sizes) For flour, egg wash, and panko
- 1 Slotted Spoon or Spider For safe removal of pickles from oil
Ingredients
Main
- 1/2 cup 104 grams mayonnaise
- 1/4 cup 40 grams dill pickle relish
- Hot sauce as desired
- Neutral oil for deep-frying
- 2 cups 225 grams dill pickle slices
- 1 cup 130 grams all-purpose flour
- 2 tablespoons 30 grams whole milk
- Splash of hot sauce
- 2 large eggs
- 2 cups 120 grams panko breadcrumbs
- 2 teaspoons dried dill
- 1 teaspoon paprika
- 1/2 teaspoon cayenne pepper
- 1/2 teaspoon garlic powder
- 1/2 teaspoon kosher salt
- Flaky salt for serving
Instructions
- For the dip: In a small serving bowl, stir together the mayonnaise and relish. Season with hot sauce and stir once more. Refrigerate until ready to serve. (The dip can be made up to a day ahead.)
- For the pickles: Add 2 inches of oil to a large, deep-sided pot or saucepan and heat over medium high to 360 degrees F. Line a baking sheet with paper towels and fit with a wire rack.
- Using paper towels, pat the pickles dry. Add the pickles to a medium mixing bowl and sprinkle with the flour. Toss to combine until the pickles are coated in flour.
- To prepare the dredge: In a separate shallow bowl, whisk together the milk, hot sauce and eggs. In a third bowl, combine the panko, dried dill, paprika, cayenne, garlic powder and kosher salt.
- Working in batches, dredge the flour-dusted pickle chips in the egg mixture, then the panko mixture, making sure to coat them completely and evenly.
- Fry half of the breaded pickles in the hot oil, flipping once, until crisp and deep golden on both sides, about 1 minute per side. Remove to the prepared baking sheet to drain of excess oil. Season with flaky salt. Repeat with the remaining dredged pickles. Serve immediately with the dip.
- Like all fried foods, the pickles are best right after frying. Leftover pickle dip will keep covered in the refrigerator for 2 to 3 days and is a good dip for other fried foods and crunchy snacks or as a sandwich spread.
Notes
Related posts:
The 15 Best Side Dishes To Pair With Hot Dogs At Your Next Cookout
Celebrate with These July 4th Potluck Recipes


